Downtime is a threat to every enterprise, which would affect productivity. Browser Security Plus offers Failover Server, to overcome these challenges. You can configure a secondary server, which will act as a standby server, whenever the primary server fails. This will ensure that the browser management system is not aborted due to any hardware surprises. This document will explain the steps involved in configuring the failover server. This feature is supported for computers running Windows XP and later versions.
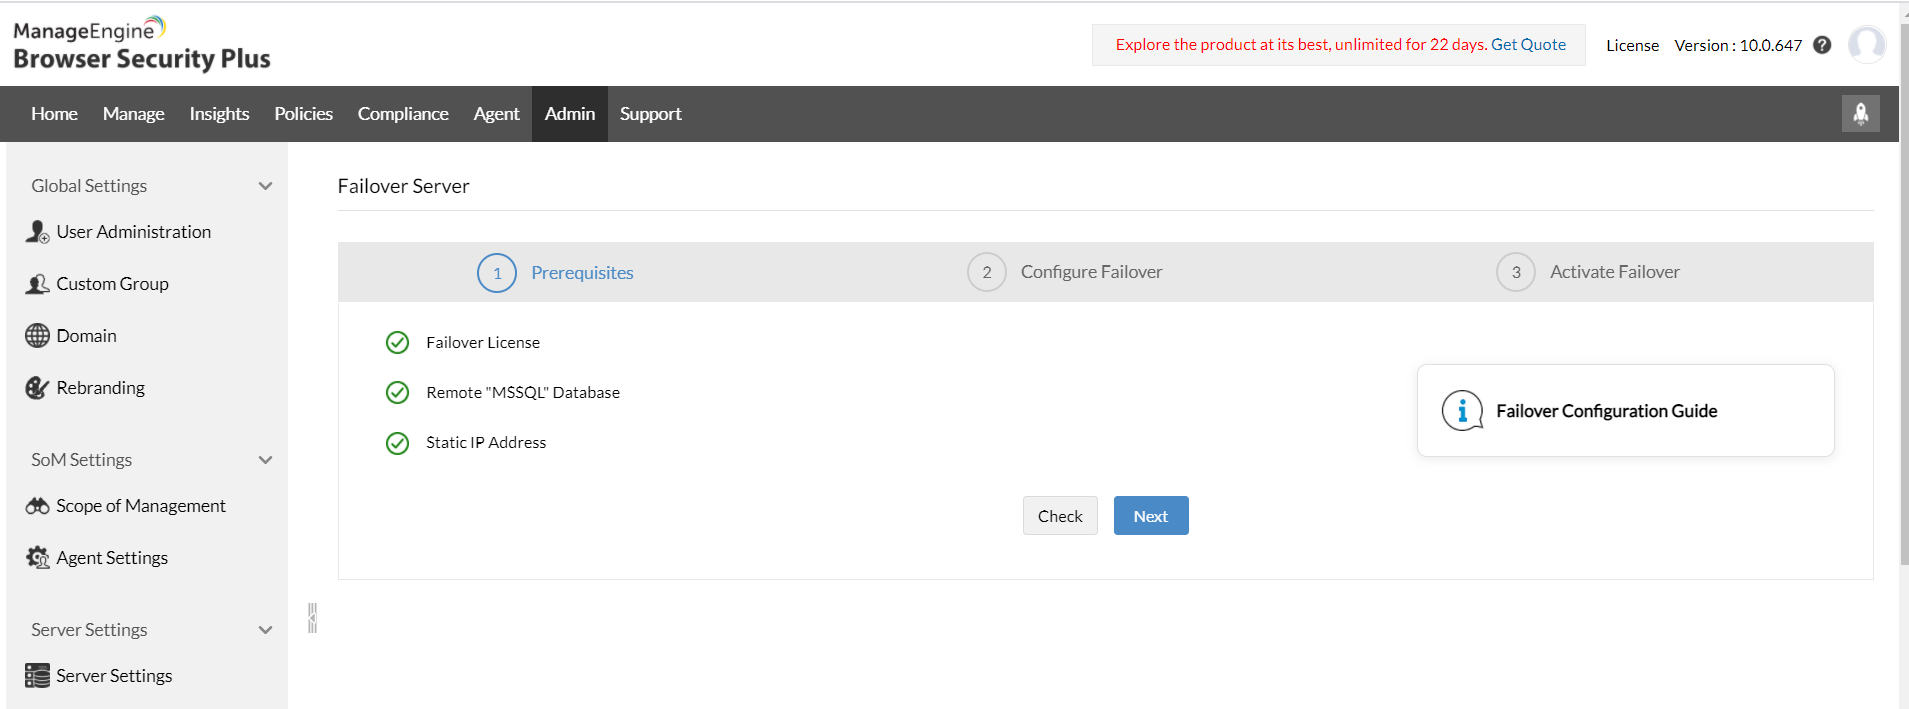
You need to ensure that the below listed criteria are met, before configuring the failover server:
Failover is supported only for MSSQL database. You should have purchased license for failover and uploaded it in the product. You need to ensure that the database is installed in a remote computer. This will ensure that the database is not affected when one of the servers is down. You should also ensure that the IP Address that you configure for the primary server and secondary server is static so that the communication will reach the appropriate static IP address.
Ensure that the Browser Security Plus' primary server, secondary server and the remote database (if any) belongs to a same domain. If you have configured NAT settings to redirect all communications to a local IP, you will have to ensure that the redirected communications reach the virtual IP address. A virtual IP address is an IP address that is shared among multiple domain names or multiple servers and this eliminates a host's dependency upon individual network interfaces.
You can configure failover server from Browser Security Plus web console -> Admin - > Failover Server. Ensure that the following prerequisites are met.
You will have to specify the Primary and Secondary Server's IP address. You will have to provide a virtual IP address, which could actually be updated to the agents. Every communication from the agent, distribution server will reach the virtual IP. If you have configured NAT settings to redirect all communications to a local IP, you will have to ensure that the redirected communications reach the virtual IP address. You will also have to specify an email address to receive notifications related to server status. You have to configure mail server to receive notifications. If it has not been done previously, this article will guide you in configuring mail server.

All request that reaches this virtual IP will be redirected to the primary server. Whenever the primary server is not reachable, the communication will be taken to the secondary server. The secondary server will periodically sync all the data from the primary server, so that it is up-to-date. Upon clicking "Save" button after providing the above details, download Configure_Failover_server.bat from the page that appears next. Copy and paste the bat file in the machine in which you are about to configure the secondary server. Now, follow the steps mentioned below to configure Failover server:
Perform the following steps on the computer, where (Primary) Browser Security Plus server is installed:
Ensure that the the secondary server do have permissions to synchronize the data from the primary server and vice versa.
You will have to enable the following settings:
The below mentioned steps should be performed on the primary server first and the same should be performed on the secondary server during activation.

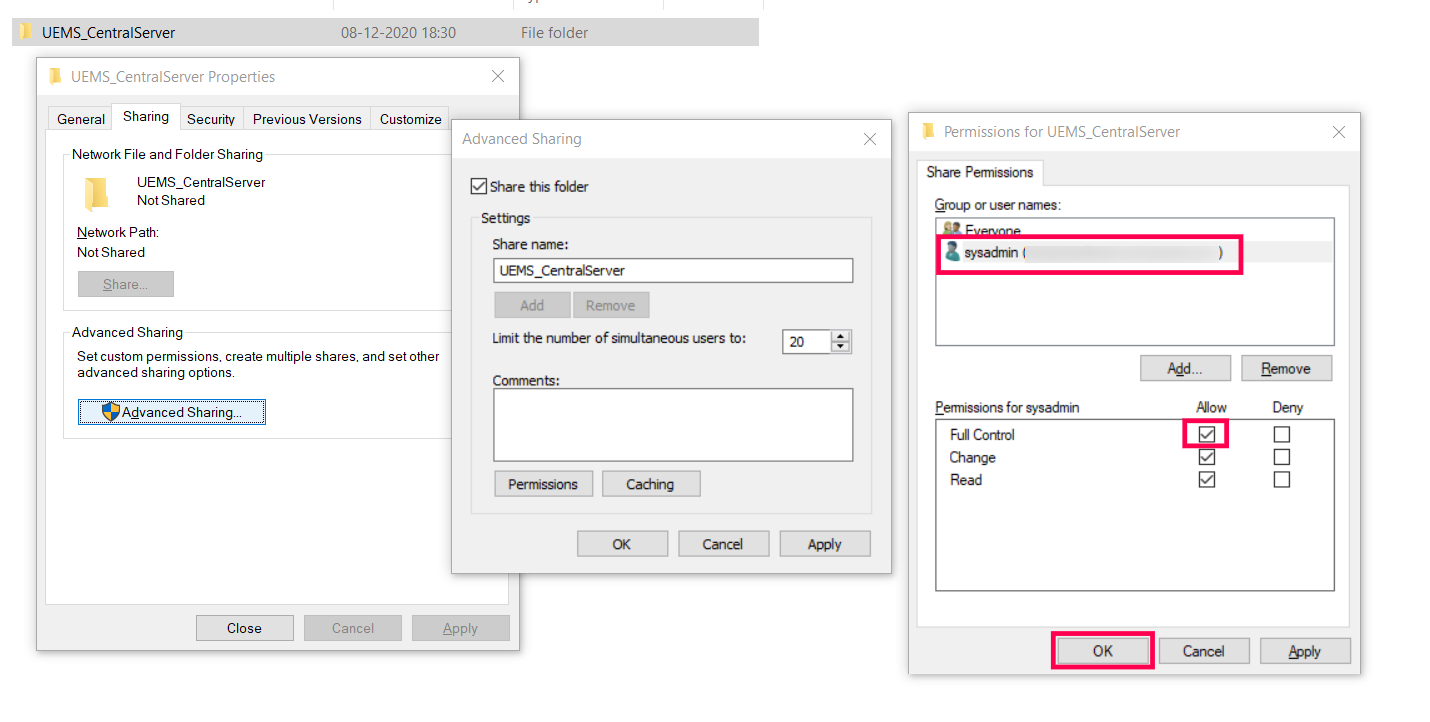
Click share permission and select user and computer and ensure that Full Control is enabled
Click OK, to complete the process.
If Browser Security Plus server is installed in Windows 10 or Windows Server 2012 R2, you will have to ensure that the permissions are modified here, (Right click) Browser Security Plus folder -> Properties -> Security -> Edit Permissions -> Edit -> Add (add the name of the secondary server).
Perform the below mentioned step on the computer where the Secondary server is installed:
You can now see that the server components are replicated to the secondary server.