Setting up the ManageEngine Analytics Plus application
This guide will show you how to set up the ManageEngine Analytics Plus application from your Jira marketplace. You can easily analyze your project management data by generating detailed, out of the box reports on projects, backlogs, sprints, issues, and much more.
- Prerequisites
- Downloading ManageEngine Analytics Plus
- Installing ManageEngine Analytics Plus
- Accessing Analytics Plus
- Configuring the email server
Prerequisites
Only Jira Software administrators can download and install ManageEngine Analytics Plus.
Ensure you have sufficient disk space (20GB) on your Jira Software server, as the Analytics Plus for Jira app will be installed on the same server.
For Windows installations, navigate to the the directory where your Jira Software is installed. Right click the folder, select the Properties option and head to the Security tab. Provide the Full Control permission for the All Application Packages and the All Restricted Packages groups that are listed under the Security tab. Click here to know more.
Downloading ManageEngine Analytics Plus
Jira Software administrators can easily download the ManageEngine Analytics Plus application from the Jira Marketplace. Follow the steps below to do this:
Step 1: Click the Settings icon on the top right corner of your Jira Software application, and select the Manage Apps option.

Step 2: Search for ManageEngine Analytics Plus, and click the Free Trial button to download Analytics Plus.
Installing ManageEngine Analytics Plus
After downloading ManageEngine Analytics Plus, you need to set up the application. While only Jira administrators can download the application, any Jira user can finish the setup process and import the Jira Software data into Analytics Plus for advanced analytics.
Follow the steps below to do this.
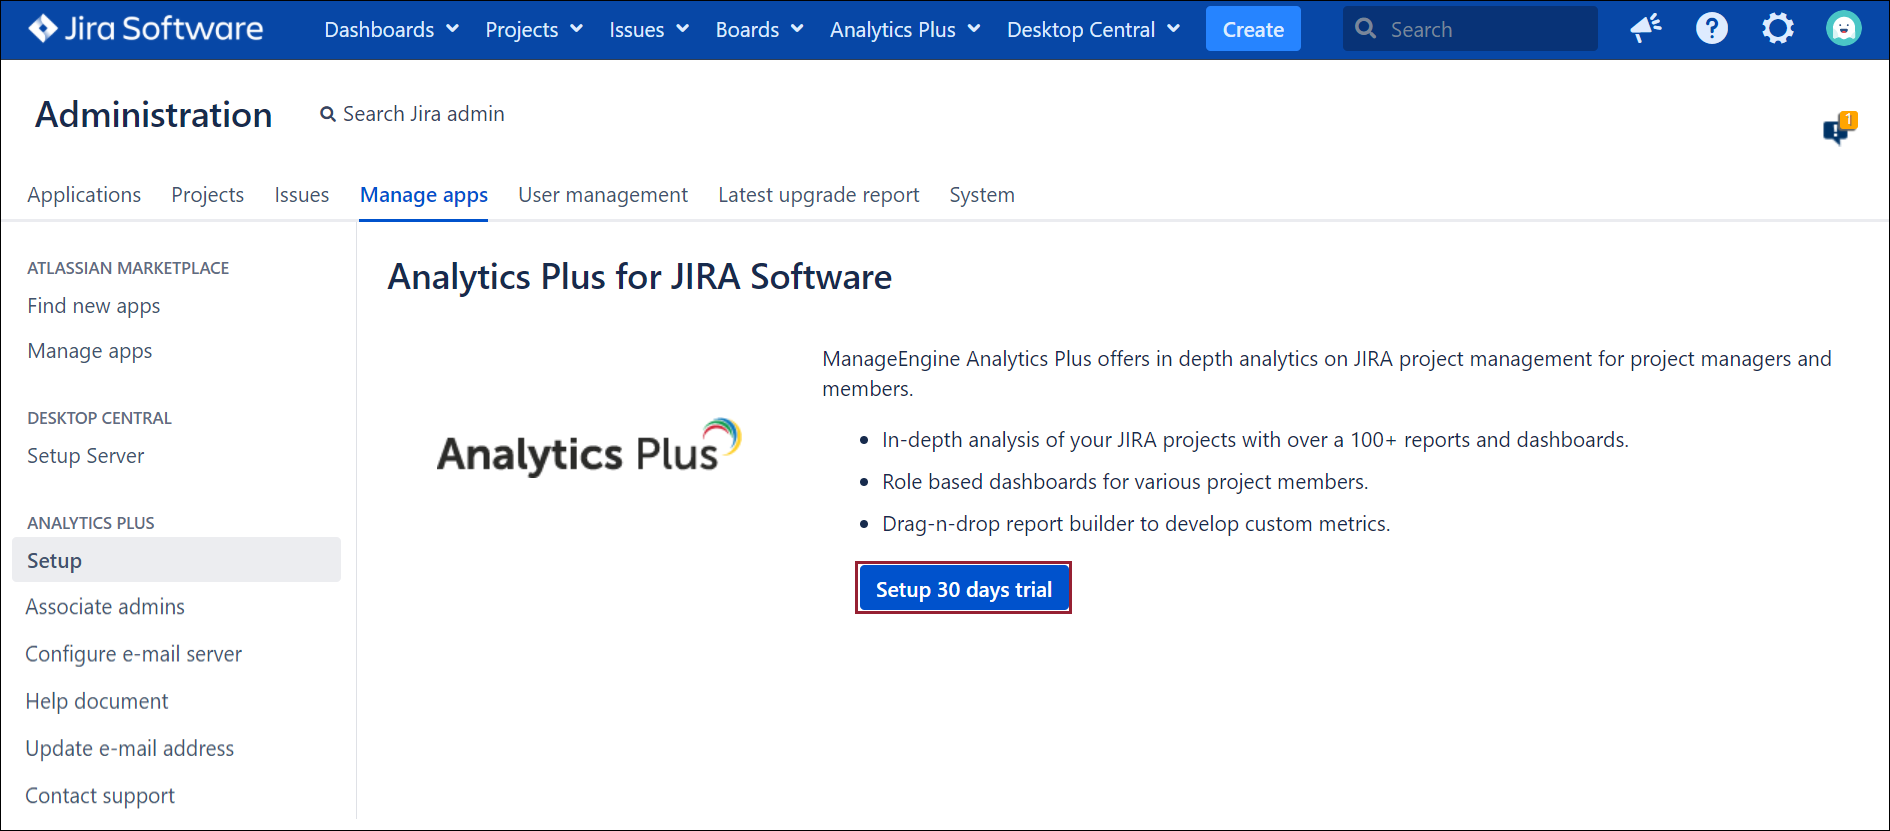
Step 1: Click the Analytics Plus button from the navigation bar, and select Home. In the page that appears, click the Setup 30 days trial button.
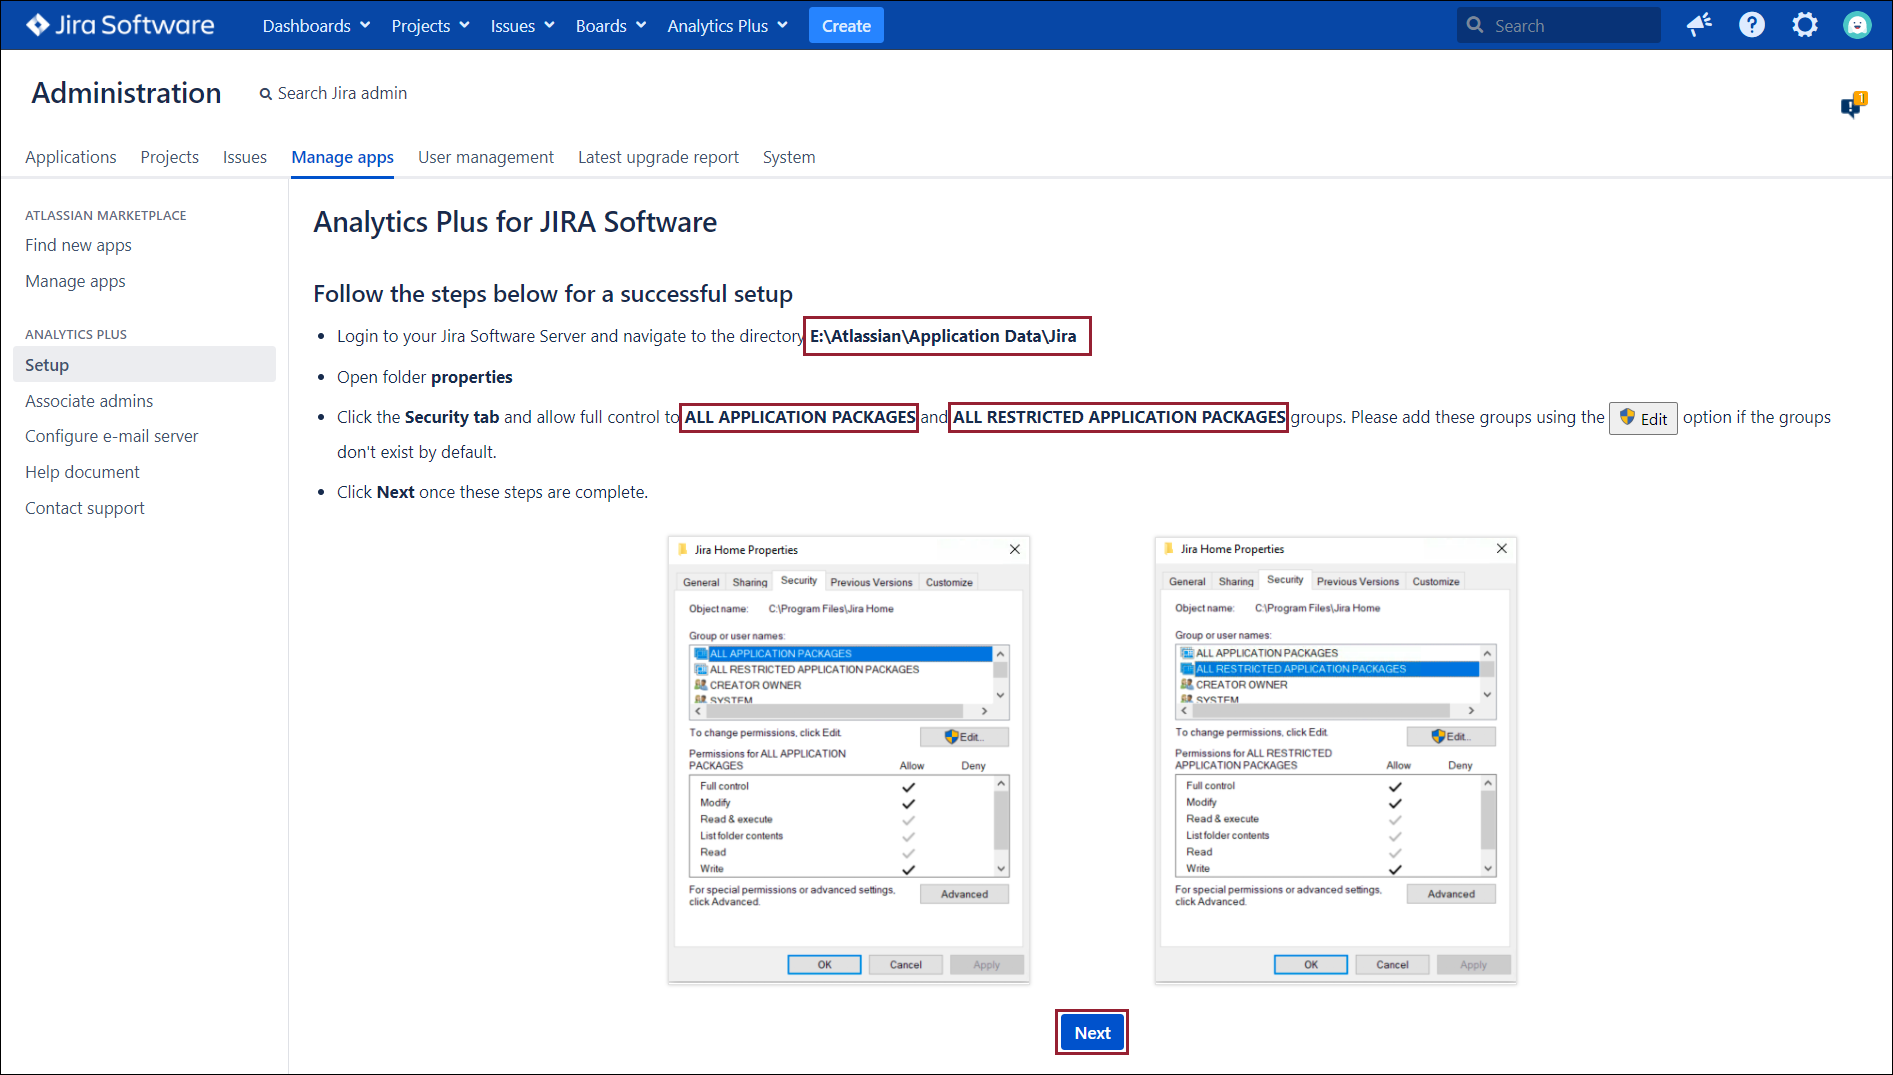
Step 2: Accept the software license. For Windows installations, carry out the below step, if you haven't made the necessary changes already.
Navigate to the folder mentioned in the page that appears i.e. the directory where your Jira Software is installed. Right click the folder, select the Properties option and navigate to the Security tab. Provide the necessary permissions, head back to your Jira application, and click Next to proceed with the setup.
Step 3: On accepting the license, and making the necessary changes in case of Windows installations, the required verifications for the installation will be carried out.
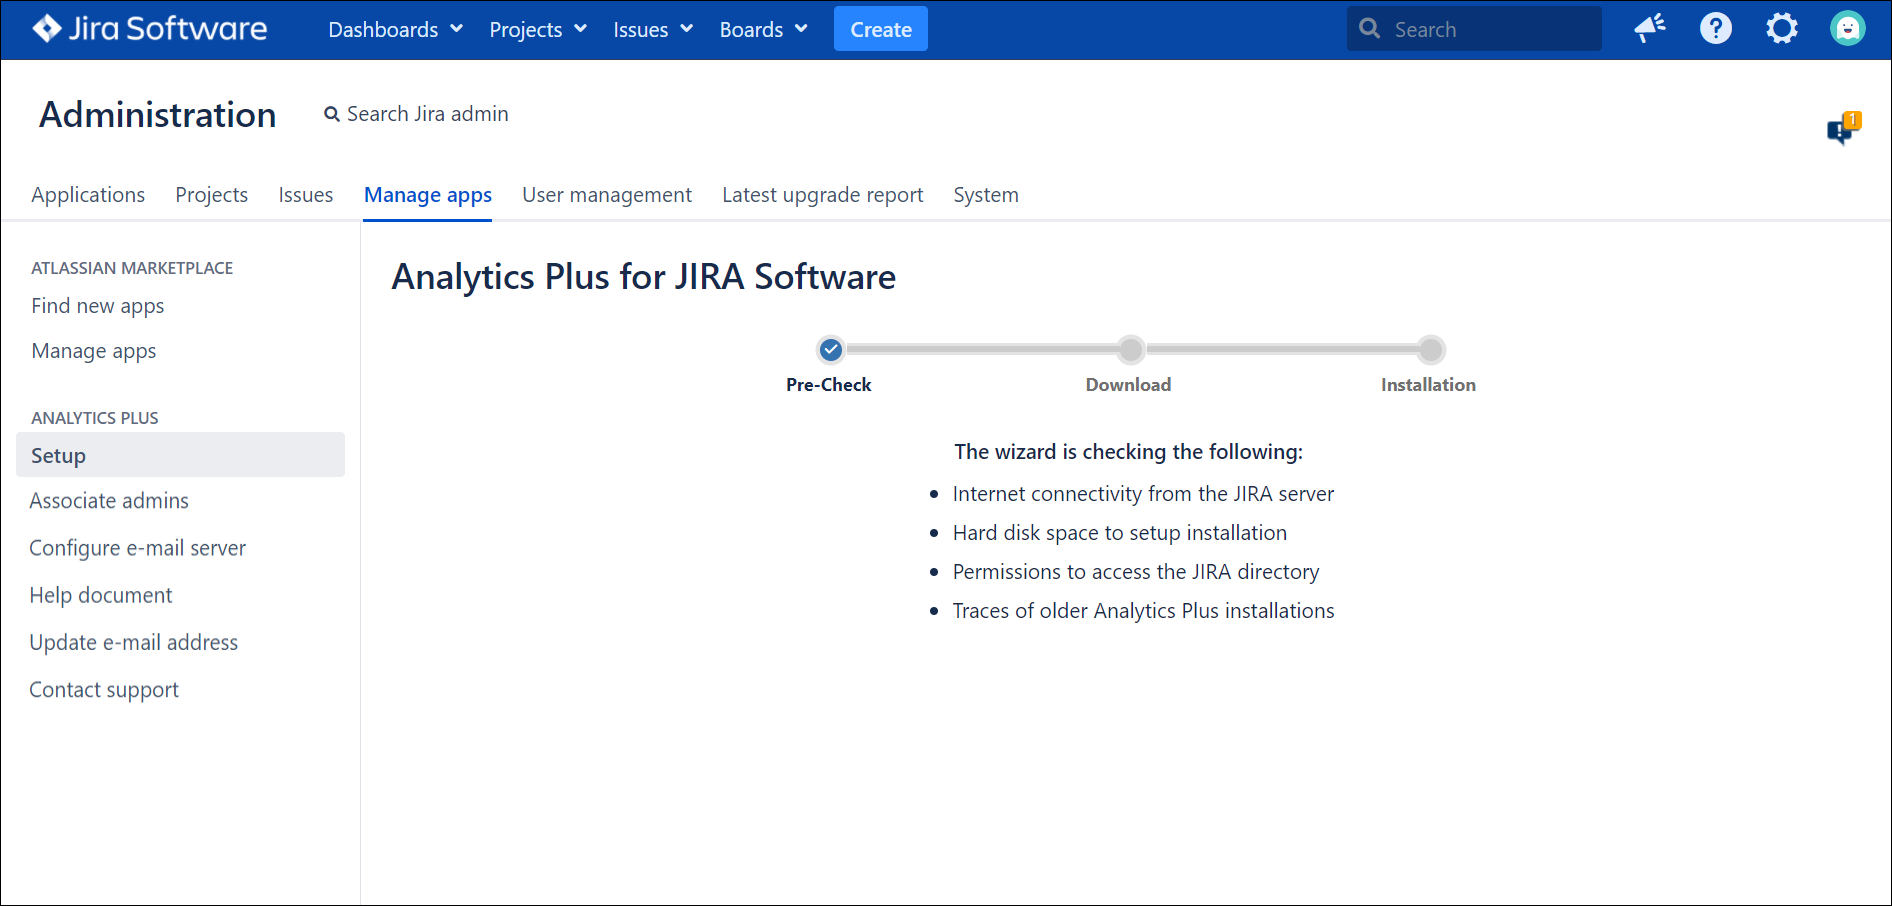
Note: If any issue arises during this step, you can either make the required changes to your system or server as suggested and try again, or manually download ManageEngine Analytics Plus by clicking the Manual Download button.
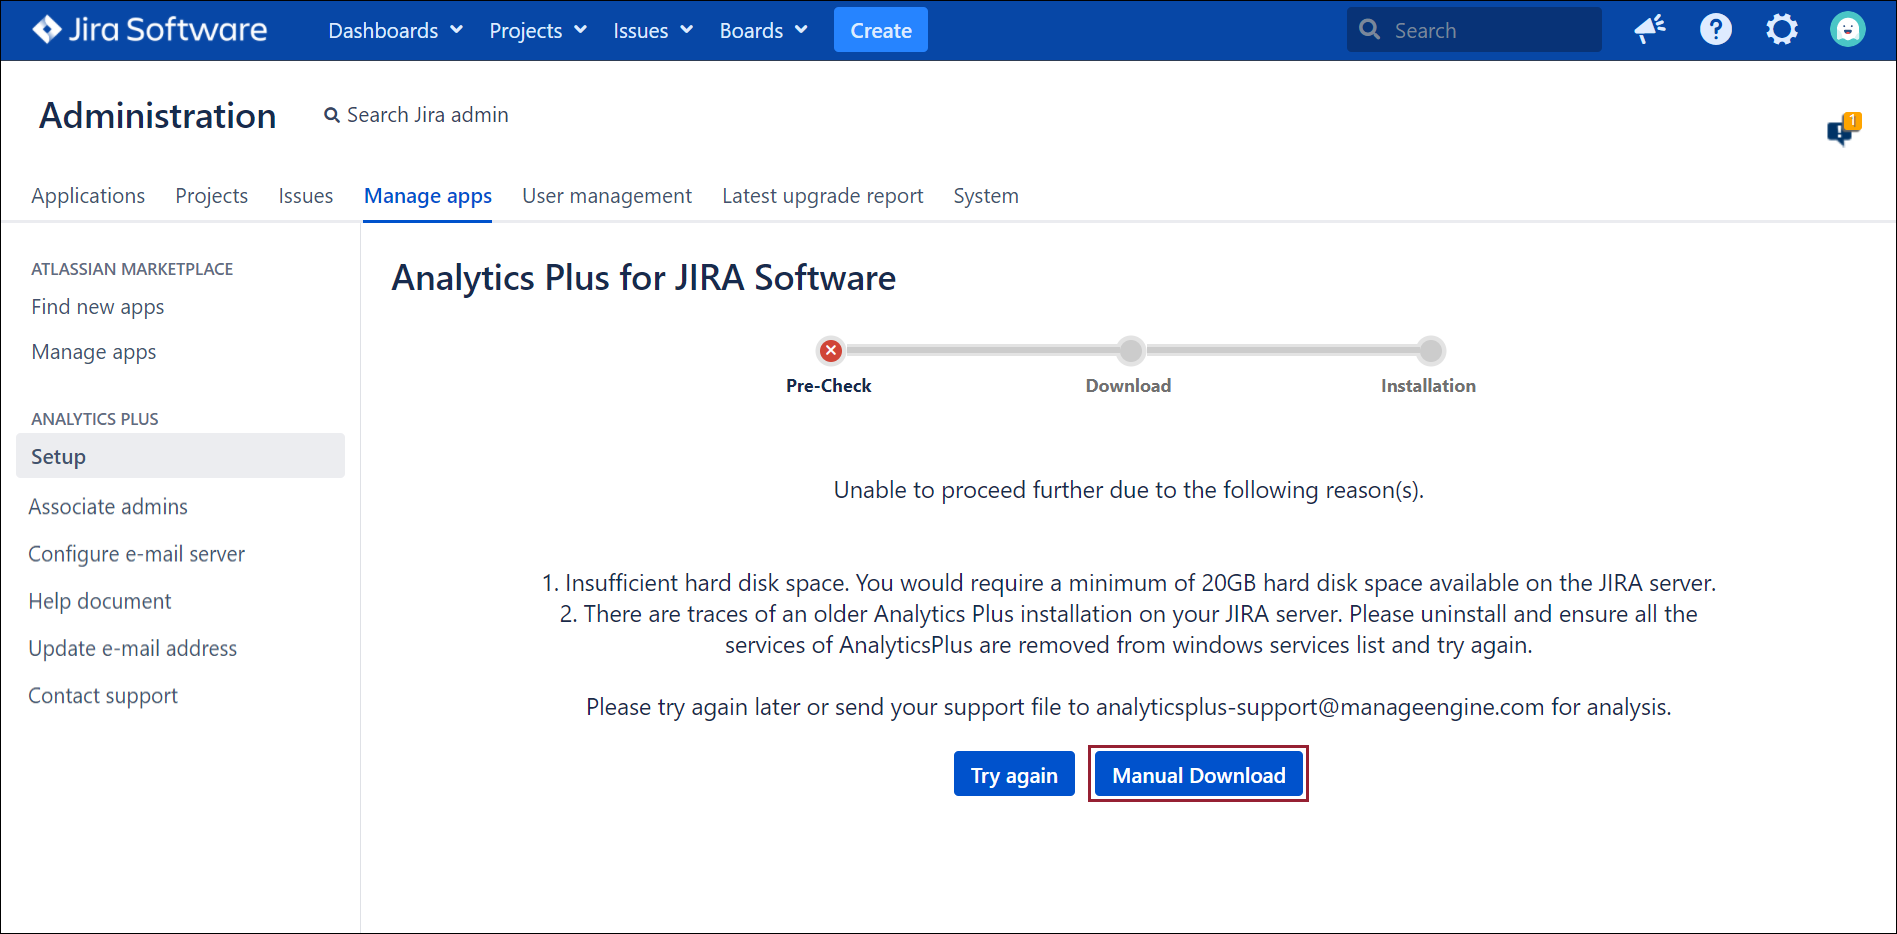
Follow the steps detailed in this page to set up ManageEngine Analytics Plus manually. If you require assistance, please drop us an email at analyticsplus-support@manageengine.com.

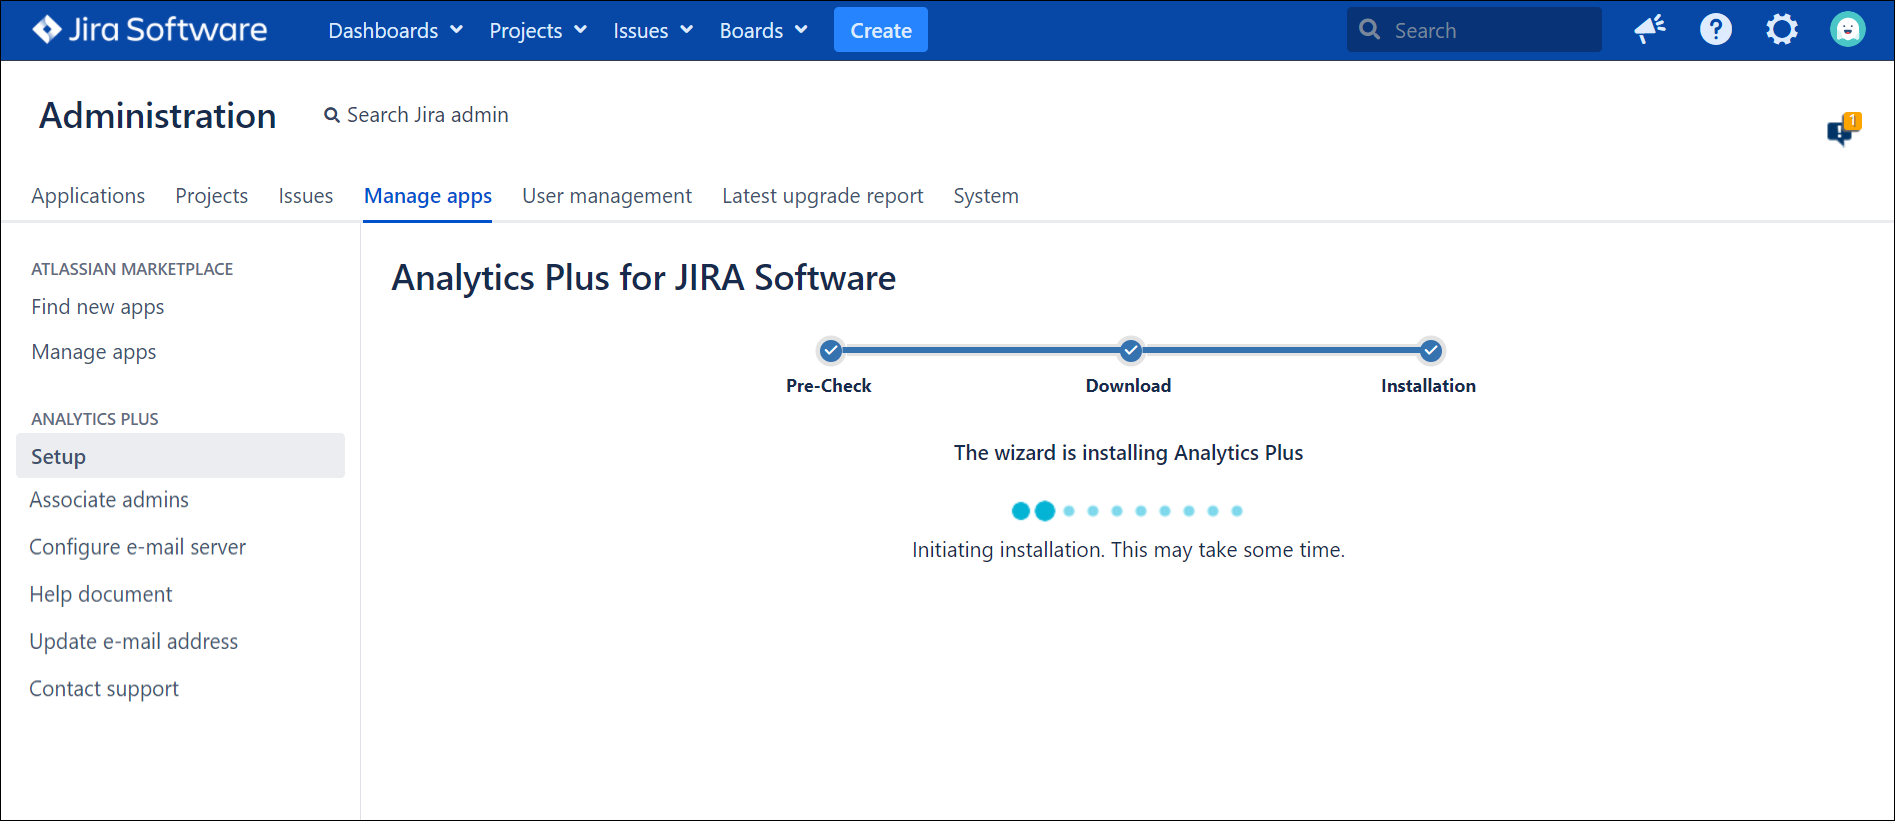
Step 4: Once the required verifications and the download is complete, the installation will begin. This process may take a while.
Configuring the authentication method
After downloading and installing the Analytics Plus for Jira app, you need to configure the method of authentication for the app. There are two ways this can be done:
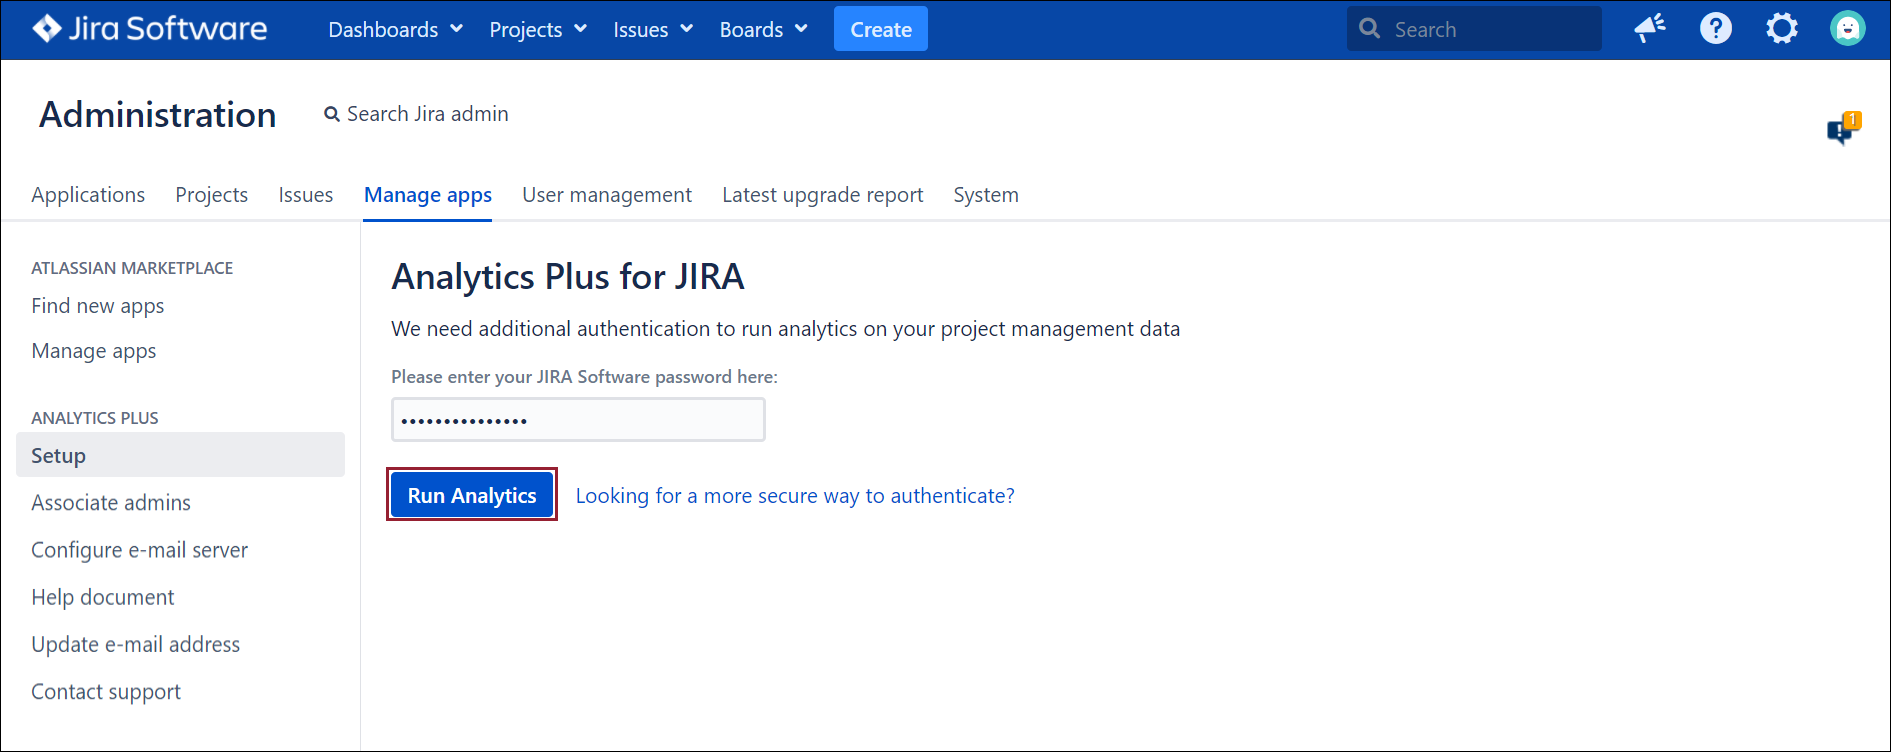
Basic authentication
Provide your Jira administrator credentials in the page that appears, and click Run Analytics to finish setting up the integration using your Jira credentials. Upon successful authentication, you can access your Analytics Plus for Jira workspace within minutes. Refer this section to learn more about accessing your Analytics Plus workspace.
OAuth authentication
If you wish to set up an Oauth based authentication instead of using your Jira password, click the Looking for a more secure way to authenticate link.

In the page that appears, copy the Analytics Plus URL and the public key to a separate text file. You'll need this in the following steps.

Navigate to the Applications tab in your Jira administrator console, and head to the Application Links section. Enter the copied Analytics Plus URL, and click Create new link.

Click Continue in the popup that appears.

Provide a name, select the Create incoming link check box, and click Continue.

Enter analytics-integ in both the Consumer Key and Consumer Name sections, and paste the public key that was copied earlier. Click Continue to proceed.

Head back to the Analytics Plus Setup screen, and click the Finish setup button.

Click Allow in the popup that appears, and then click Continue to finish setting up the Analytics Plus for Jira app.

Accessing Analytics Plus
If you're not already on the Analytics Plus setup page, you can access the same by clicking Settings > Manage apps > Analytics Plus > Setup, or by clicking Analytics Plus > Home from the navigation bar. In the page that appears, click the Access advanced analytics button.

Please note that it may take anywhere between 5-10 minutes for the data to be synchronized with Jira Software initially. Once the initial synchronization is completed, your Analytics Plus workspace opens in the same tab, with out-of-the-box reports and dashboards built specifically for Jira Software.

Note:
Ensure you allow cookies in your browser to view your Analytics Plus workspace.
Post setup completion, it may take anywhere between 5-10 minutes for the data to be synchronized with Jira Software, during this period some reports and metrics may not display data.
Refer the Creating reports and dashboards section to learn how to create reports and dashboards in Analytics Plus.
Configuring e-mail server
You need to the configure e-mail server through which mails are to be sent. This is essential for sharing reports and dashboard. Follow the steps below to configure your e-mail server:
Step 1: Click Analytics Plus > Configure e-mail server from the navigation bar.

Step 2: In the page that appears, provide the SMTP server name, port address and e-mail address. If the SMTP server requires authentication, select the Requires Authentication check box, and enter your username and password. To enable TLS support and establish a secure connection, select the TLS Enabled and SSL Enabled options respectively. Test the settings, and click Save.

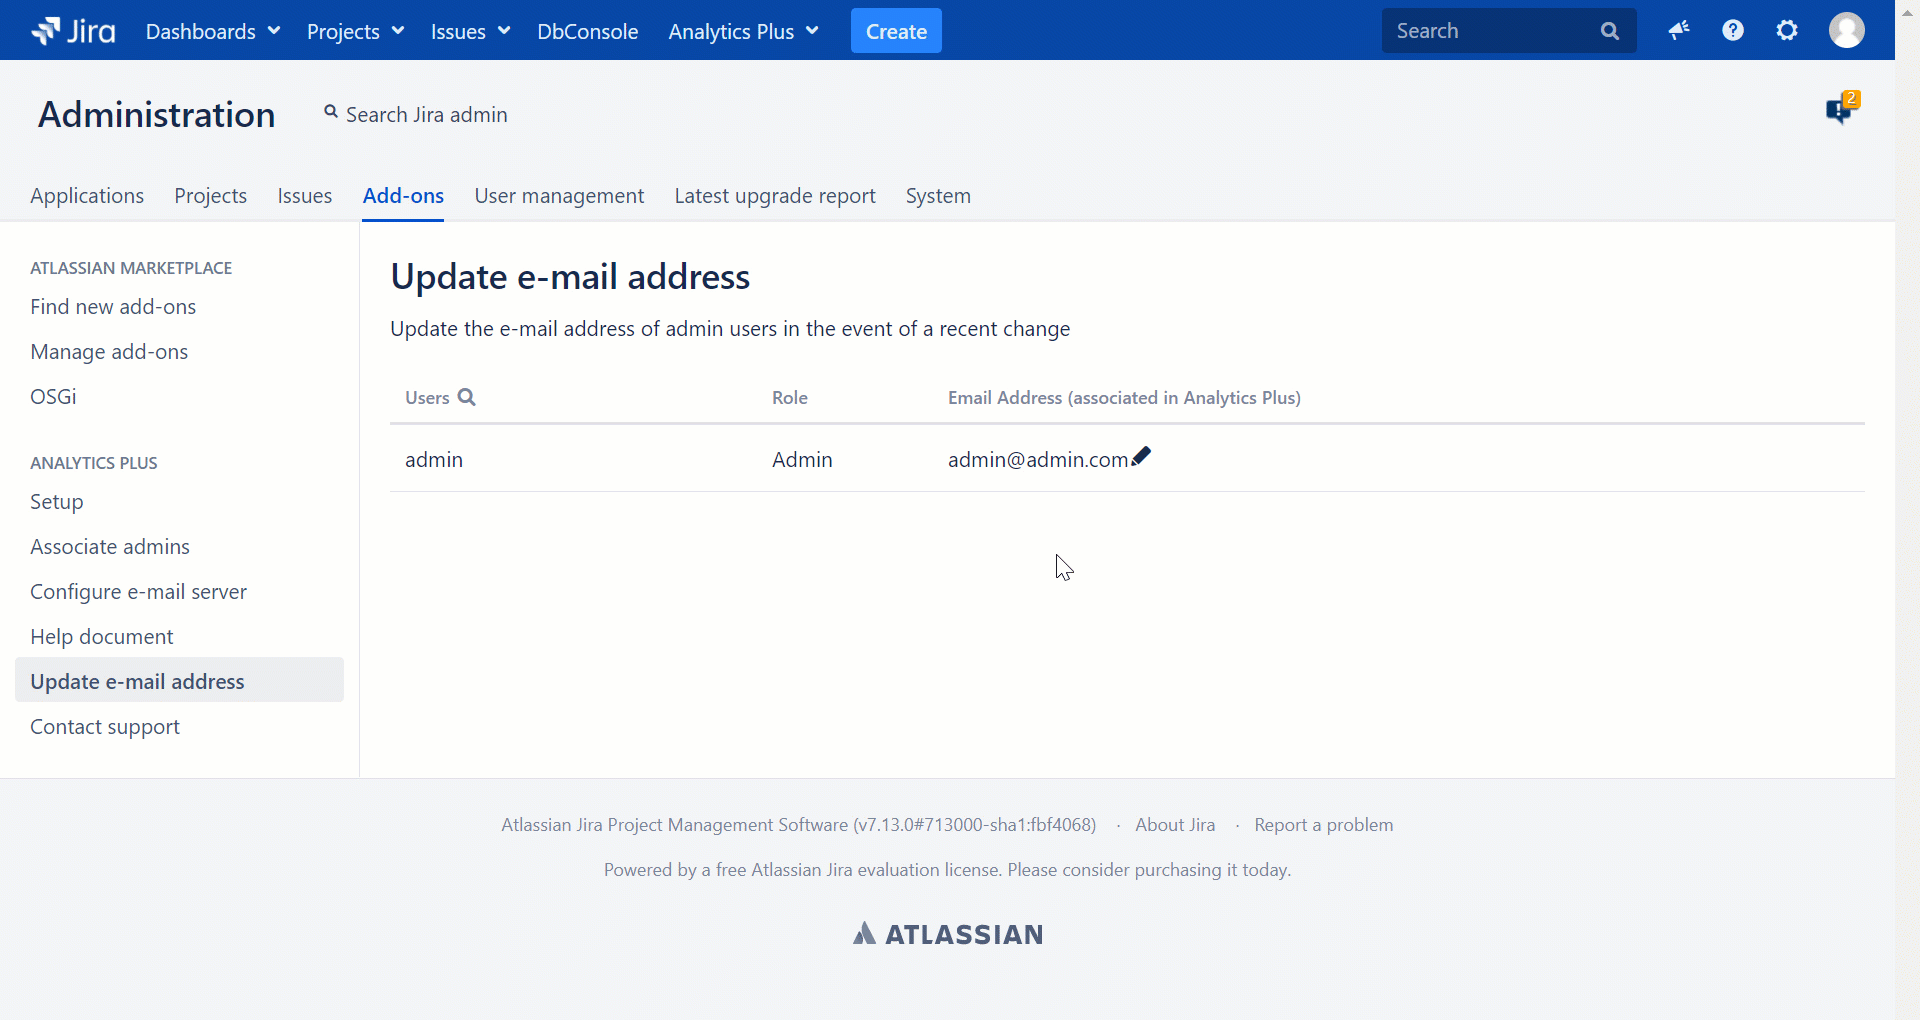
Updating your email address
If the email address of an Analytics Plus admin has been changed, it needs to be updated in the Analytics Plus for Jira app to avoid authentication failure. Follow the steps below to do this.
Step 1: Click Analytics Plus > Update e-mail address from the navigation bar, or click Settings > Manage Apps > Update e-mail address.
Step 2: In the page that appears, navigate to the required user, click the edit icon, enter the updated email address, and click Apply.