Integrating PAM360 with Enterprise Ticketing Systems
PAM360 comes with the facility to integrate with a wide range of ticketing systems, to automatically validate service requests related to privileged access. The integration ensures only users with a valid ticket ID can access the authorized privileged passwords. This integration also extends to the PAM360 workflow, which helps in granting approvals to password access requests upon automatic validation of corresponding service requests in the ticketing system.
In this document you will learn the following with respect to integrating PAM360 with ticketing systems:
- How does this Integration work?
- Ticketing Systems
- Steps to integrate your Ticketing System with PAM360
- Ticketing system validation enforcement and exceptions
- Disabling ticketing system integration
- Integrating other Ticketing Systems
- Code Snippet For ServiceNow Custom Implementation
- Interface Description
1. How does this Integration work?
Once you integrate PAM360 with an Enterprise Ticketing System, users will be required to enter a valid ticket ID for password retrieval or reset and PAM360 will do the following before granting access:
- Validate that the ticket ID entered by the user exists in the ticketing system.
- Verify that the incident connected with the ticket is NOT in the 'Closed' state.
- Verify whether the user is authorized to view that password and thereby access the IT resource.
- Verify for appropriate permissions in the case of password reset attempts.
In addition to verifying the above by default, PAM360 also lets you define custom criteria and validate them with the ticketing system before granting access to the passwords. The entire process is completely audited - which means, privileged actions can be traced using ticket IDs and password access can be traced using ticket numbers in the ticketing system. In addition, you can generate custom reports on privileged access scenario through the ticket IDs.
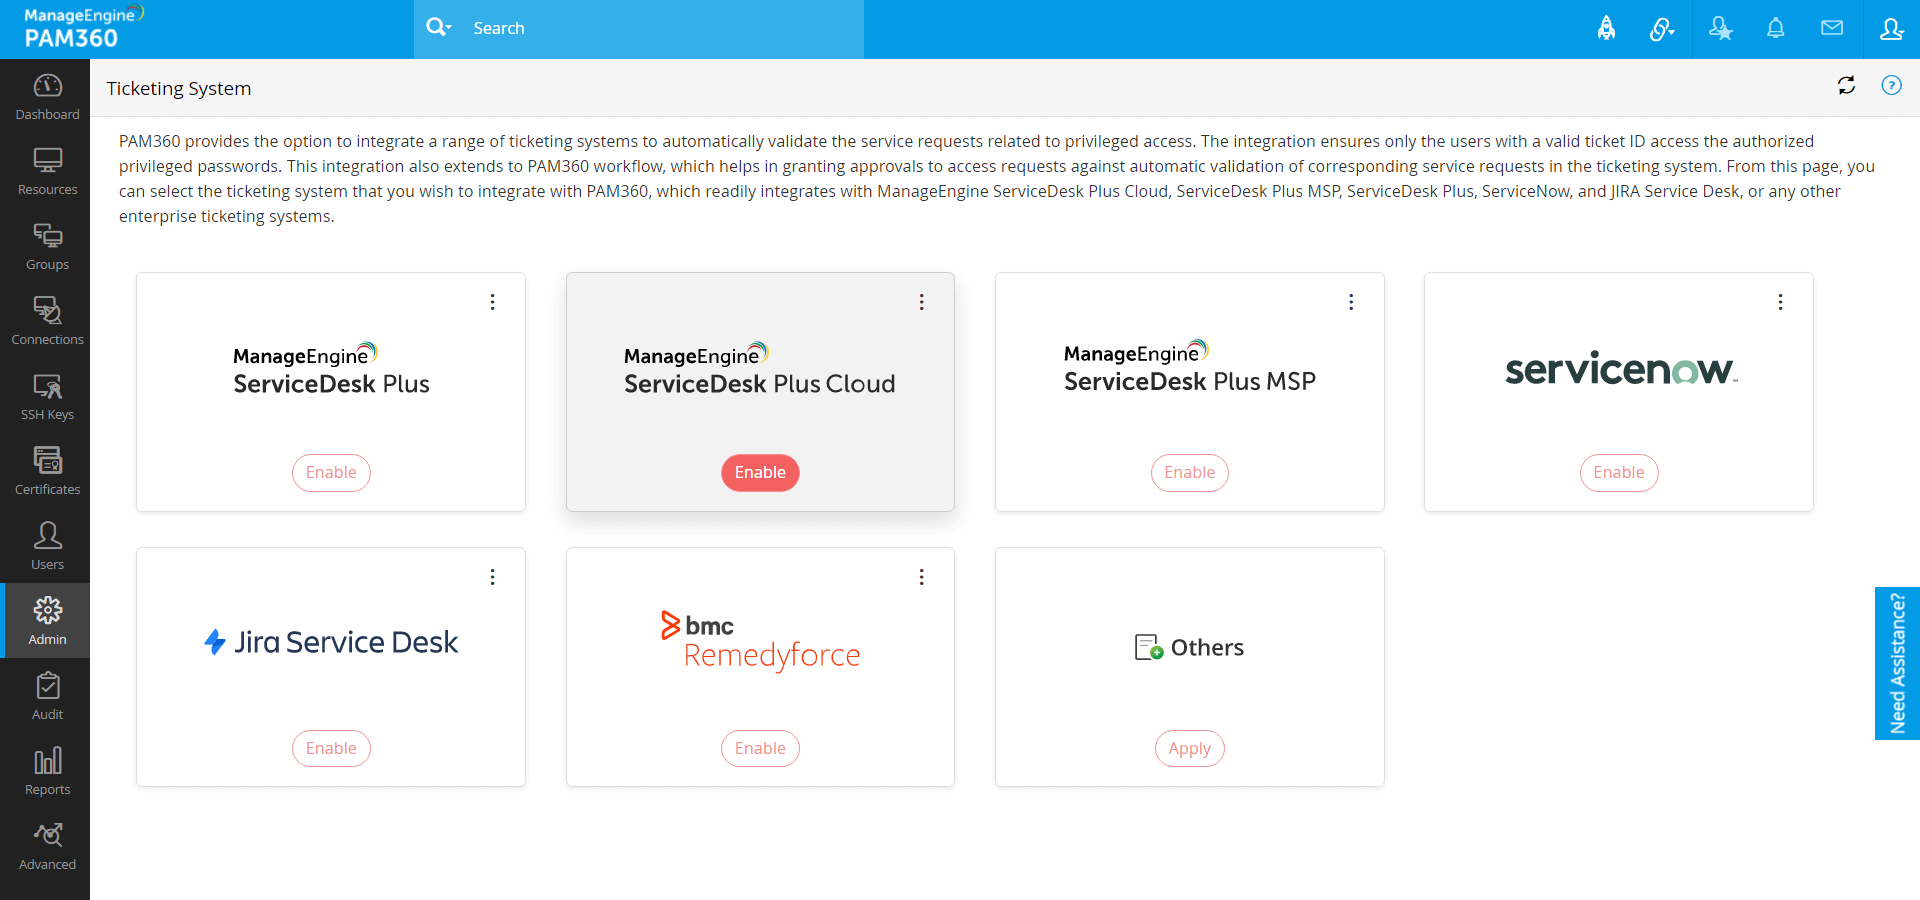
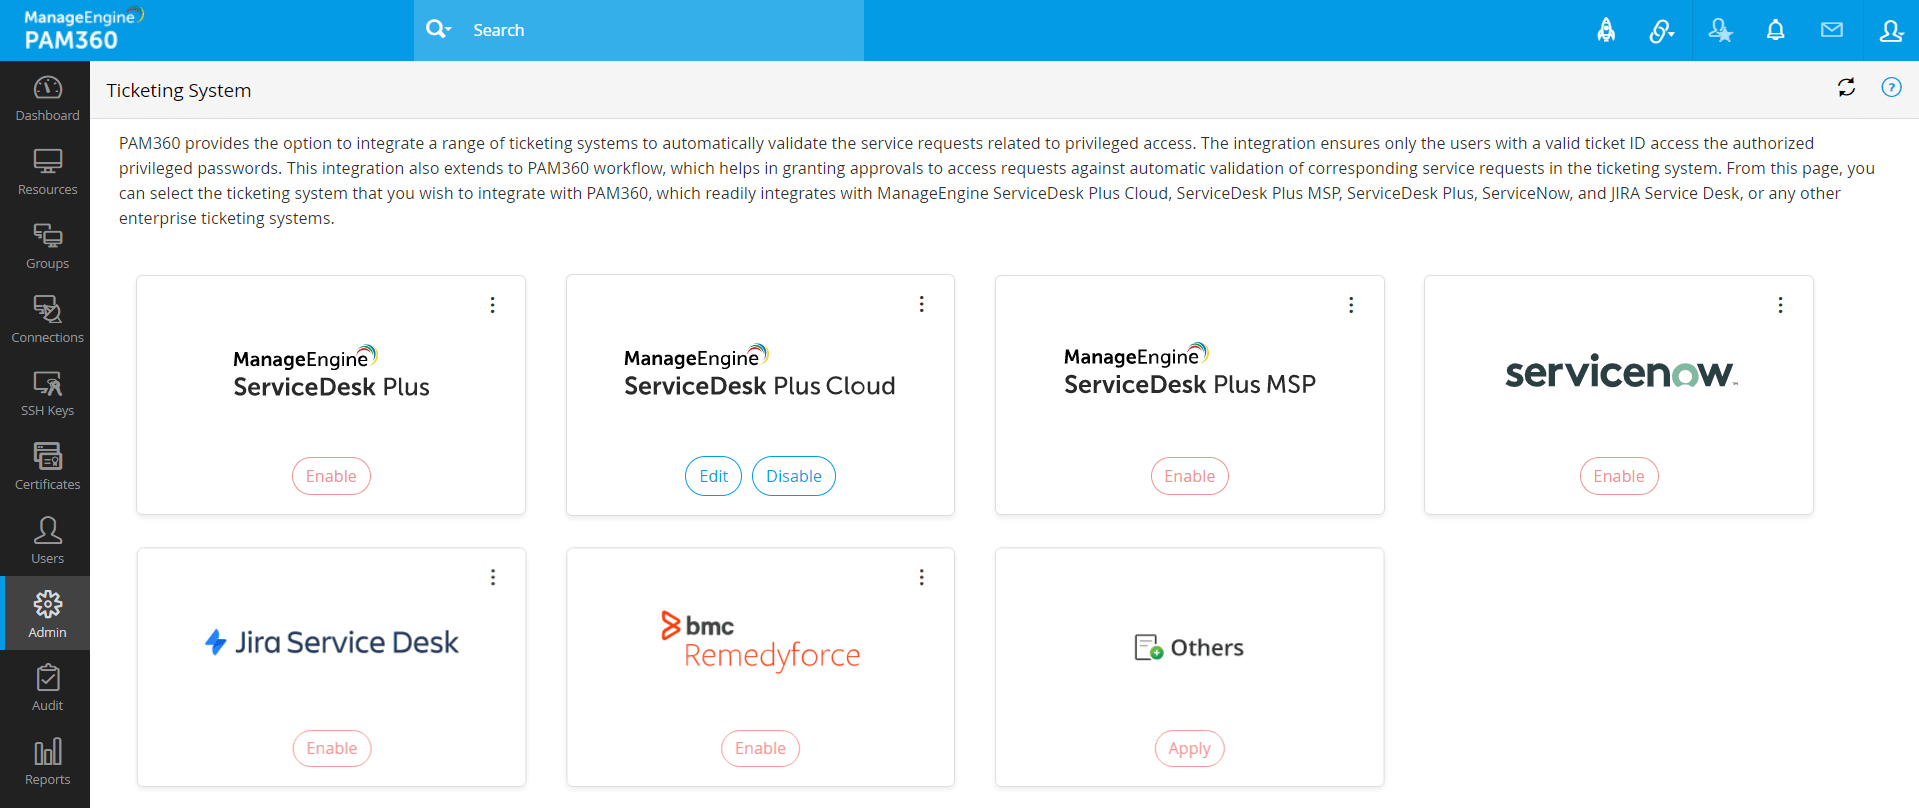
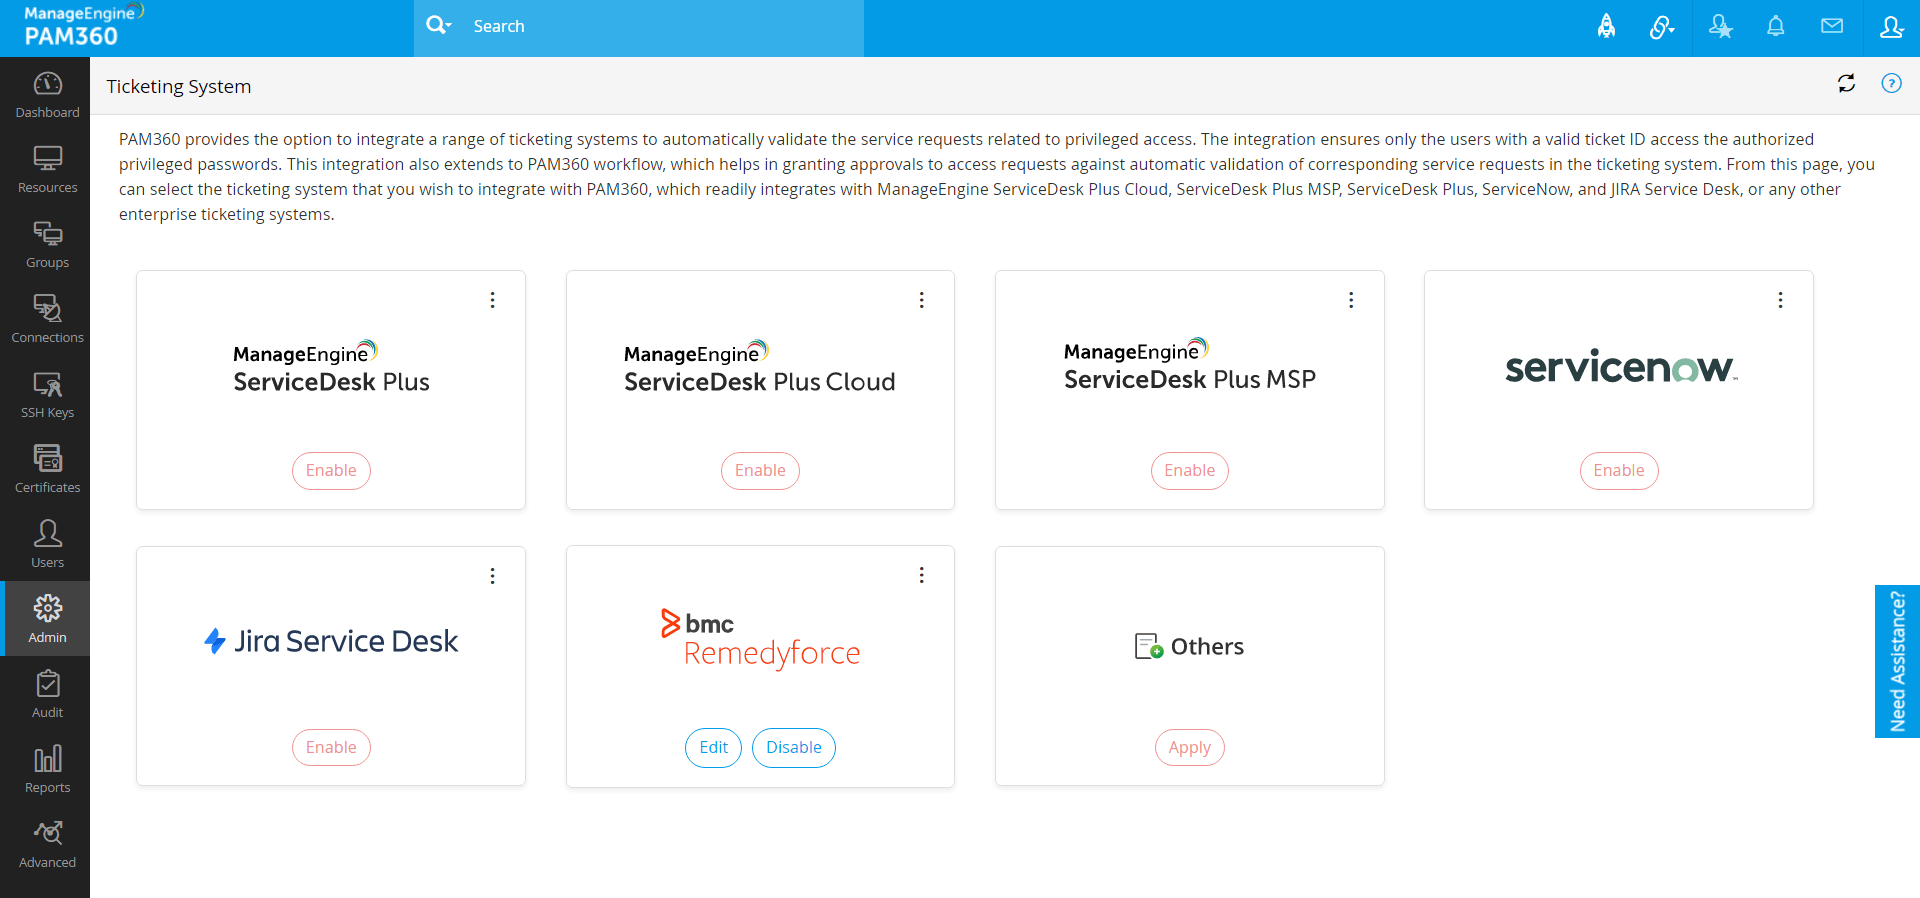
2. Ticketing Systems
Integrating PAM360 with your ticketing system is so simple. PAM360 readily integrates with the following:
- ManageEngine ServiceDesk Plus On-Demand (Cloud)
- ServiceDesk Plus MSP
- ServiceDesk Plus
- ServiceNow
- JIRA
- BMC Helix Remedyforce
Apart from the above, you can integrate PAM360 with any other Enterprise Ticketing System.
3. Steps to Integrate your Ticketing System with PAM360
Remember: If your ticketing system is ServiceDesk Plus or ServiceDesk Plus MSP and it is running in the HTTPs mode, the identity of the system needs to be verified through a valid SSL certificate, which has to be imported into the PAM360 certificate store. To do this, follow the below steps:
- Stop the service.
- Navigate to the <PAM360_Installation_Folder>/bin directory.
- Execute any of the following:
Windows:
importCert.bat <Path of the certificate used by ServiceDesk Plus or ServiceDesk Plus MSP>
Linux:
importCert.sh <Path of the certificate used by ServiceDesk Plus or ServiceDesk Plus MSP>- Restart the service.
- Navigate to Admin >> Integration >> Ticketing System
Integration.
- In the page displayed, select the ticketing system you wish to integrate, from the list of supported
ticketing systems. If the ticketing system that you use is not found in the list, select
Others.
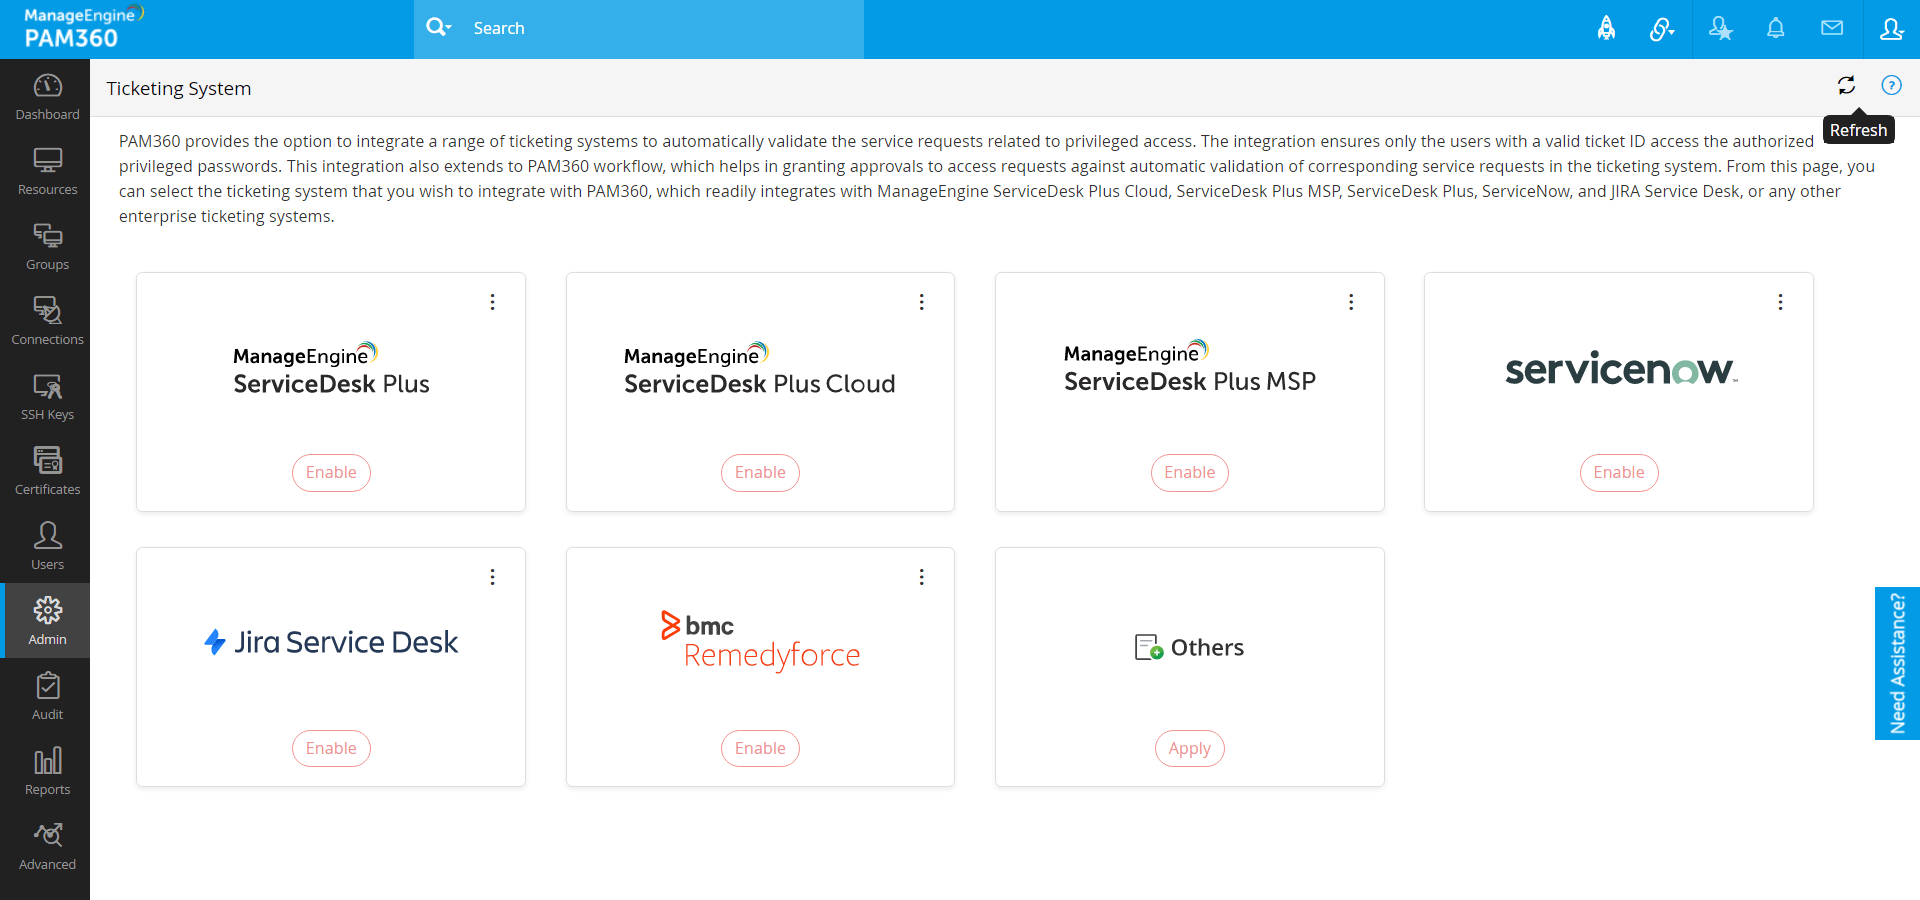
- Click Save.
3.1 Detailed steps to integrate with the Ticketing Systems that are readily supported
Integration with the ticketing systems that are readily supported is very straightforward. You just need to provide the details necessary to establish connection with the ticketing system.
Note: Ticketing System URL should not be entered with a '/' at the end (E.g. https://localhost:8080/).
3.2 Settings to Establish Connection with different Ticketing Systems
Basically, the integration is achieved leveraging the REST APIs provided by the respective ticketing system. So, all that you need to do is to specify/generate the Authentication Token and Ticketing System's application URL.
Generating Auth Token:
You can generate and obtain the the Auth Token for each of the ticketing systems as below:
1. ManageEngine ServiceDesk Plus:
- Log in to ManageEngine ServiceDesk Plus.
- Click API Key Generation under the Username at the top right corner of the page.
2. ManageEngine ServiceDesk Plus MSP:
- Log in to ManageEngine ServiceDesk Plus MSP.
- Click API Key Generation under the Username at the top right corner of the page.
3. ManageEngine ServiceDesk Plus Cloud:
- Go to Zoho Developer Console.
- Choose the Client Type as Server-based Application.
- Enter the following details:
- Client Name:
The name of your application you want to register with ManageEngine ServiceDesk Plus Cloud (PAM360 is advisable).- Home page URL:
Mention the PAM360 access URL.
Example: https://<server>:port/ (or) https://<domain_name>.com- Authorized Redirect URIs:
<homepageurl>/sdpodAuth/saveSDPODRefreshAndAccessTokens- Click Create to generate the following credentials:
- Client ID: The consumer key generated from the connected app.
- Client Secret: The consumer secret generated from the connected app.
4. ServiceNow:
- Log in to PAM360 and navigate to Admin >> Integration >> Ticketing System.
- Click ServiceNow.
- Click Generate beside the AUTH Token field.
- Mention the Username, Password and click Proceed.
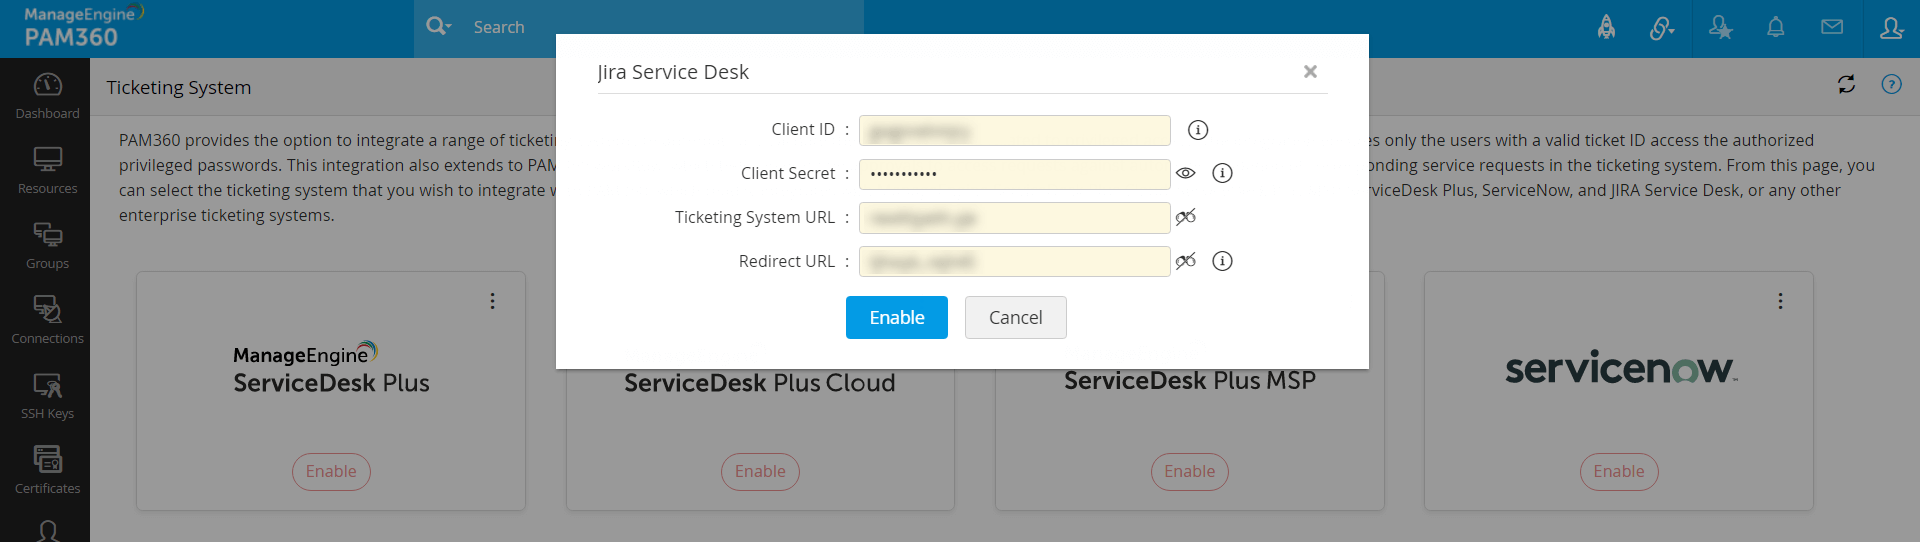
5. JIRA Service Desk:
- Go to Atlassian Developer Console.
- Click Create and select OAuth 2.0 integration.
- Provide the app Name ("PAM360" recommended) and click Create.
- In the UI that appears, click Permissions from the left pane.
- Click Add against Jira API.
- Now, click Configure against Jira API.
- In the page that appears, under Jira Service Management API, click Edit Scope.
- Select View Jira Service Management request data and click Save.
- Click Authorization from the left pane.
- Click Add.
- In the UI that appears, mention the Callback URL in the below given format and click Save changes.
- https://<HOSTNAME>:<PORT>/jiraAuth/saveJiraAccessToken
- Click Settings from the left pane.
- Here, you will find the Client ID and Secret.
3.2.1 ServiceDesk Plus Cloud
PAM360 integrates with ManageEngine ServiceDesk Plus Cloud to automatically validate access request with a valid ticket ID to grant privileged access. This can be done by generating AUTH token and entering the valid ticket ID in the ticketing system. You can also check the value of the change ID status associated with the ticket ID by selecting that option and entering the changeID status.
Configuring ServiceDesk Plus Cloud in PAM360:
- Navigate to Admin >> Integrations >> Ticketing System.
- Click Enable under ManageEngine ServiceDesk Plus Cloud.
- Now, enter the Client ID, Client Secret generated from the previous step.
- Mention the Ticketing System URL and Redirect URL.
Note: Mention the Home page URL from the previous step as the Redirect URL.
- Click Enable.
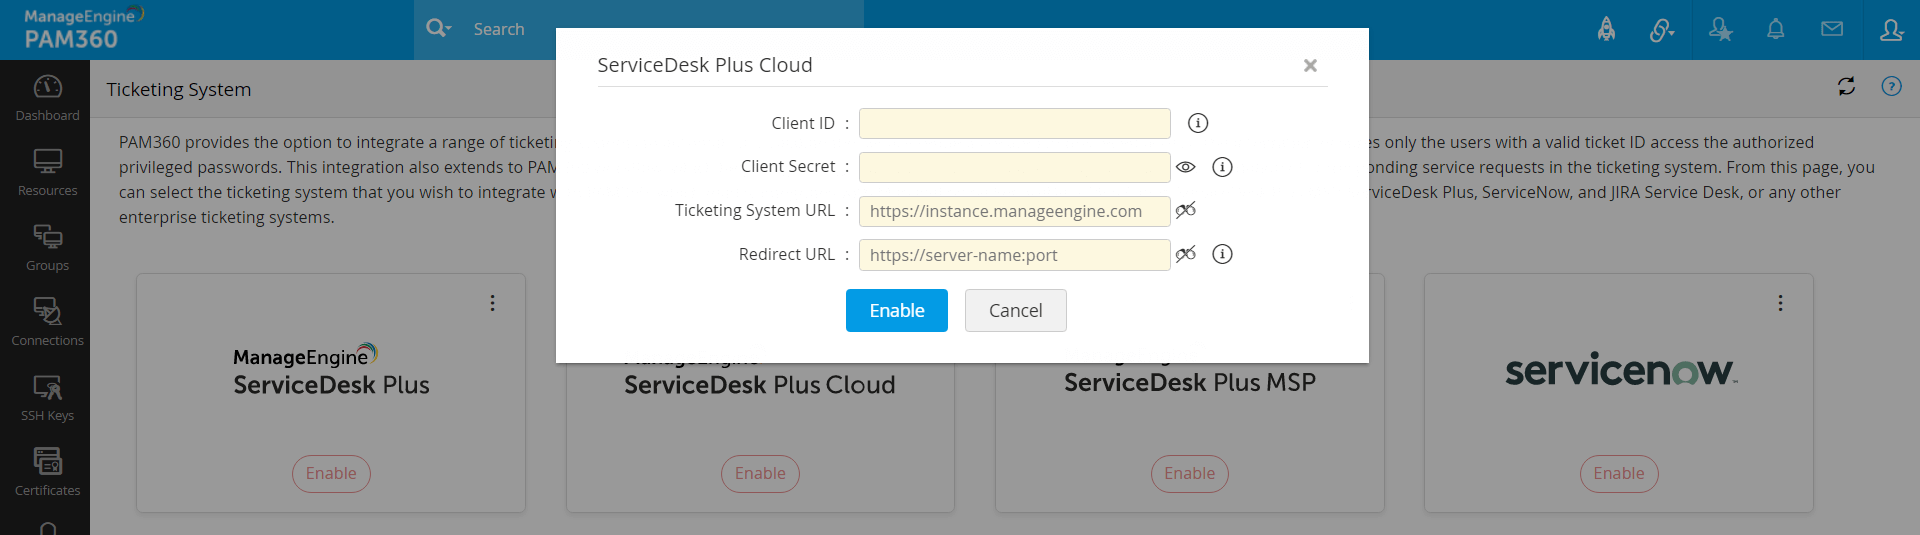
The ServiceDesk Plus Cloud configurations have been saved successfully.
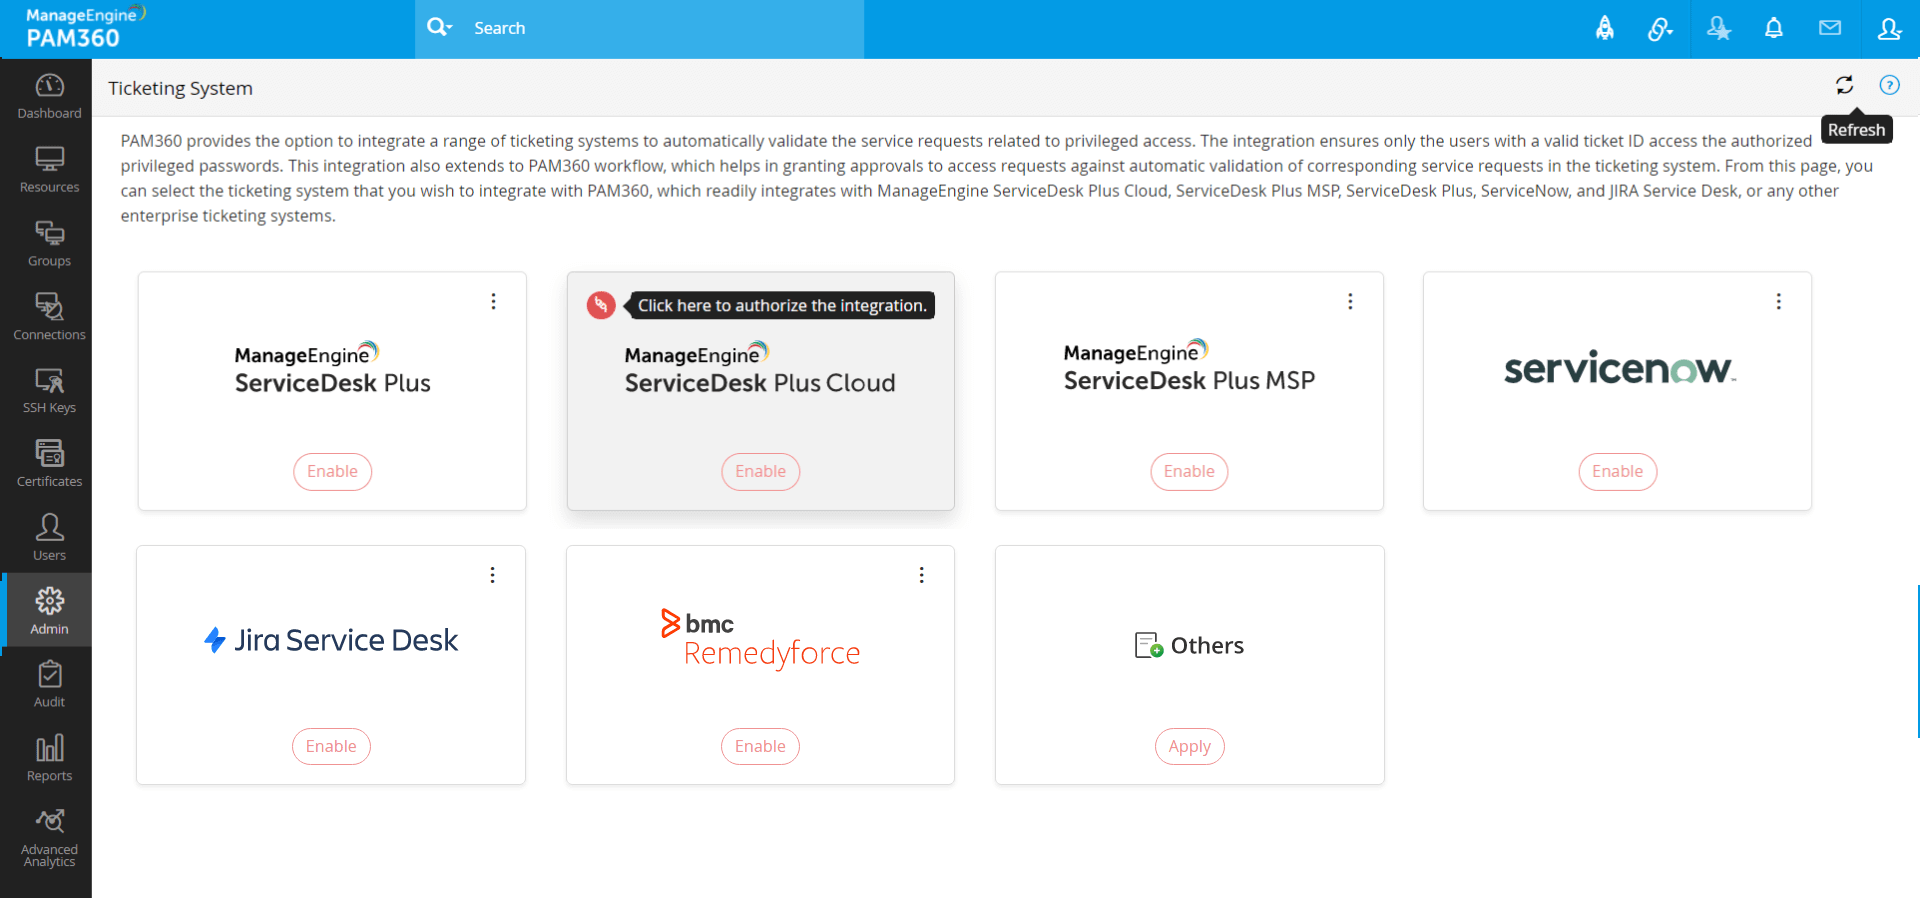
Authorizing ServiceDesk Plus Cloud:
- To authorize ServiceDesk Plus Cloud, click the refresh icon on top right corner of PAM360 to find the red icon on top left corner of ManageEngine ServiceDesk Plus Cloud.
- Click the red icon to authorize and enable the integration.
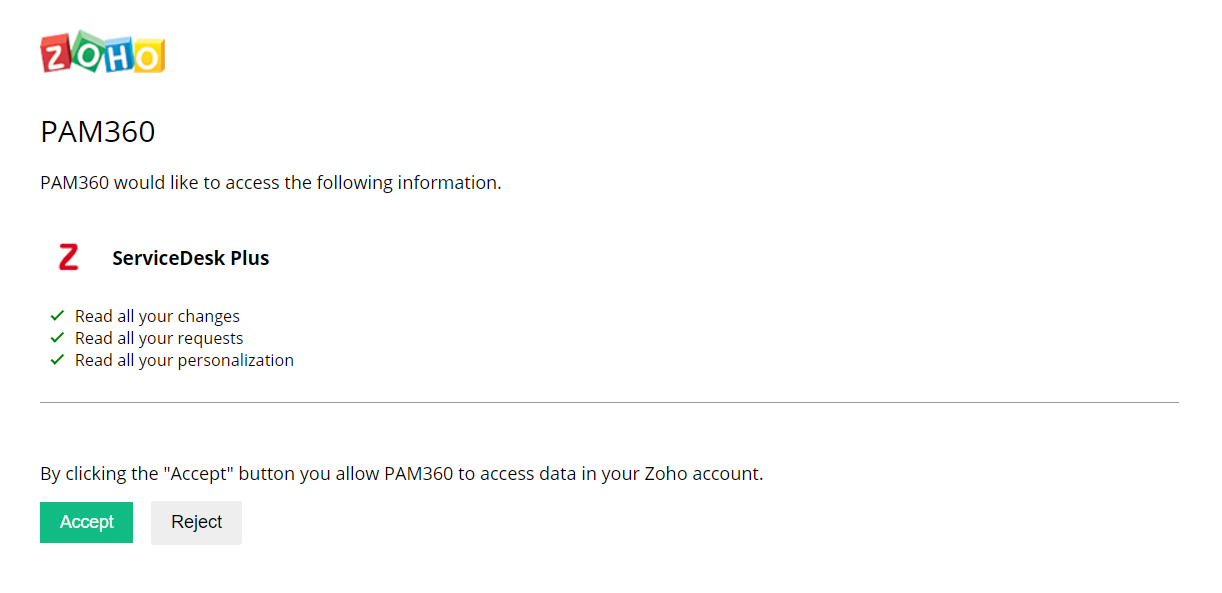
- In the UI that appears, read the conditions and click Accept to allow PAM360 to access
data.
Note: Remember, only users with a technician role in the Ticketing System should 'Accept' the above request to view and validate the tickets.
- ServiceDesk Plus Cloud has been configured successfully as ticketing system in PAM360.
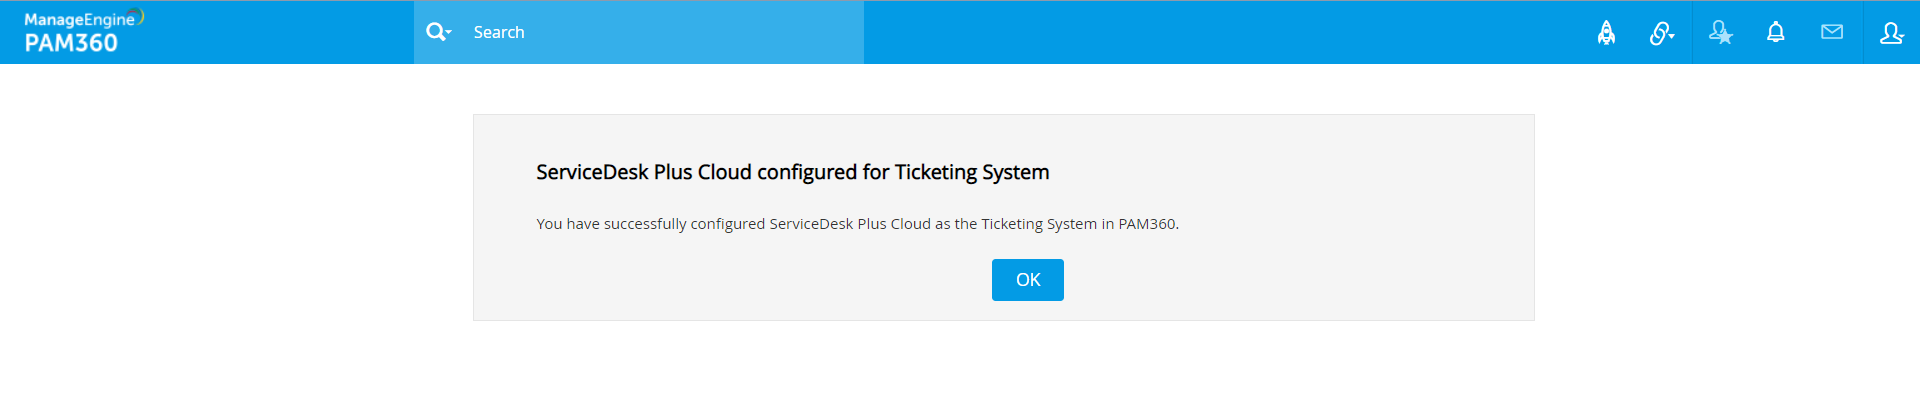
- Now, click OK to exit the GUI and click the refresh icon on top right
corner of PAM360 for the changes to appear.
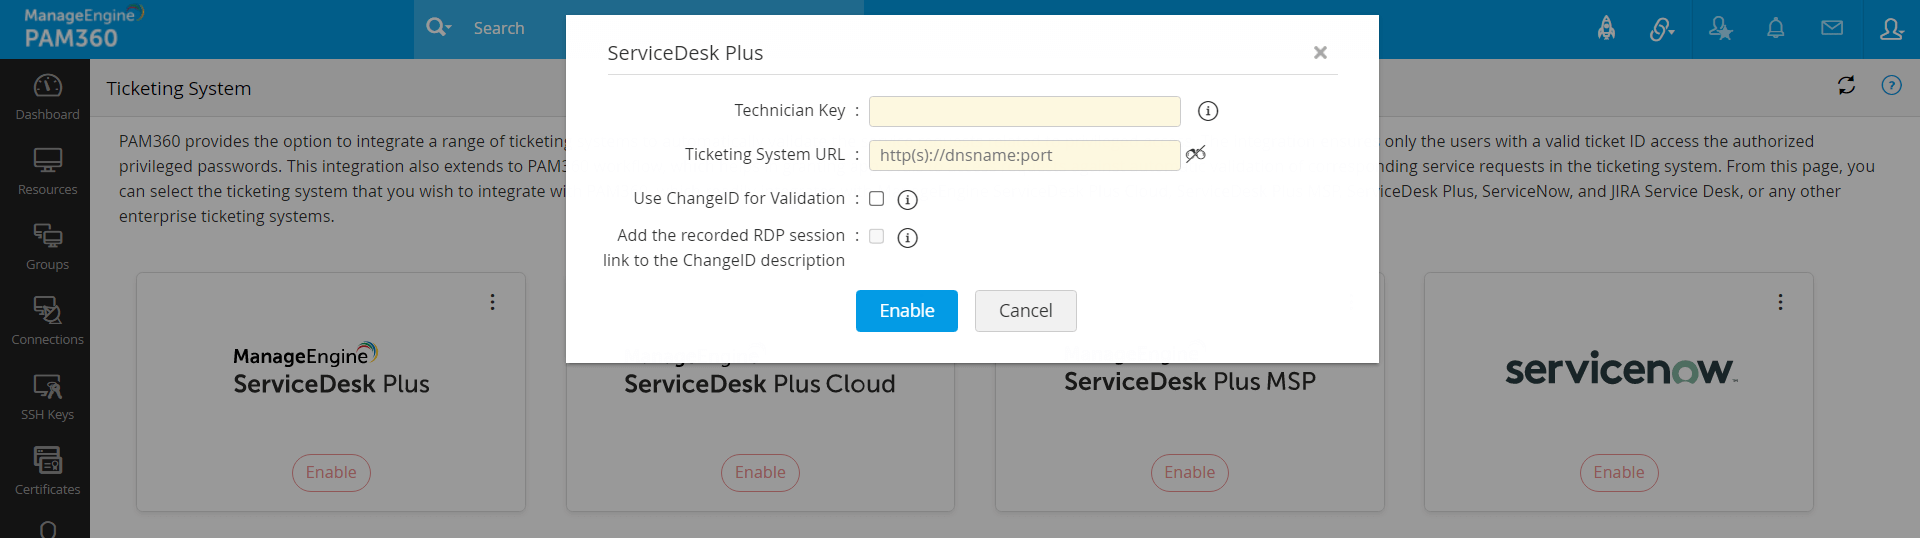
3.2.2 ServiceDesk Plus MSP
PAM360 integrates with ManageEngine ServiceDesk MSP to automatically validate access request to privilege access only with a valid ticket ID. This can be done by generating Technician key and entering the valid ticket ID in the ticketing system.
3.2.3 ServiceDesk Plus
- PAM360 now integrates with ManageEngine ServiceDesk Plus by validating change request in addition to the ticket ID entered by the user in the ticketing system. And validation occurs only when the change ID provided is approved in Manage Engine Service Desk Plus.
- Enabling this option will require your users to provide valid Change IDs for validation of password access requests and other similar operations. On the other hand, if you leave this option unchecked, users will have to submit valid Request IDs for validation.
3.2.4 ServiceNow
PAM360 now integrates with ServiceNow. By integrating with ServiceNow, you can get data from the following simply by entering the Ticketing system URL in the respective field <instance>. <ticketingsystem>.com and by entering the number.
- ServiceNow Incident - INC(7 digit number) eg) INC0010007
- ServiceNow Change - CHG(7 digit number) eg) CNG0000003
- ServiceNow Change Task - CTASK(7 digit number) eg)CTASK0000009
- ServiceNow Request - REQ(7 digit number) eg) REQ0010004
- ServiceNow Request Item - RITM (7 digit number) eg) RITM0010007
- ServiceNow Problem - PRB(7 digit number) eg) PRB0000007
- ServiceNow Project - PRJ (7 digit number) eg) PRJ0000009
- ServiceNow Project Task - PRJTASK(7DIGIT NUMBER) eg)PRJTASK0010001
- ServiceNow Task - TASK(7 digit number) eg)TASK0010001
Enabling this option will require your users to enter any of the above valid numbers in PAM360 for validation of password access requests.
3.2.5 JIRA Service Desk
PAM360 now readily integrates with JIRA Service Desk integration to automatically validate service requests related to privileged access.
Configuring JIRA Service Desk in PAM360:
- Navigate to Admin >> Integrations >> Ticketing System.
- Click Enable under Jira ServiceDesk.
- Now, enter the Client ID and Client Secret generated from the previous step.
- Mention your Jira Service Management URL as the Ticketing system URL and the Access URL you use to access the PAM360 server as the Redirect URL.
- Click Enable.
The Jira Service Desk configurations have been saved successfully.
Authorizing Jira Service Desk:
- Click the red icon on top left corner of Jira Service Desk to
authorize and enable the integration.
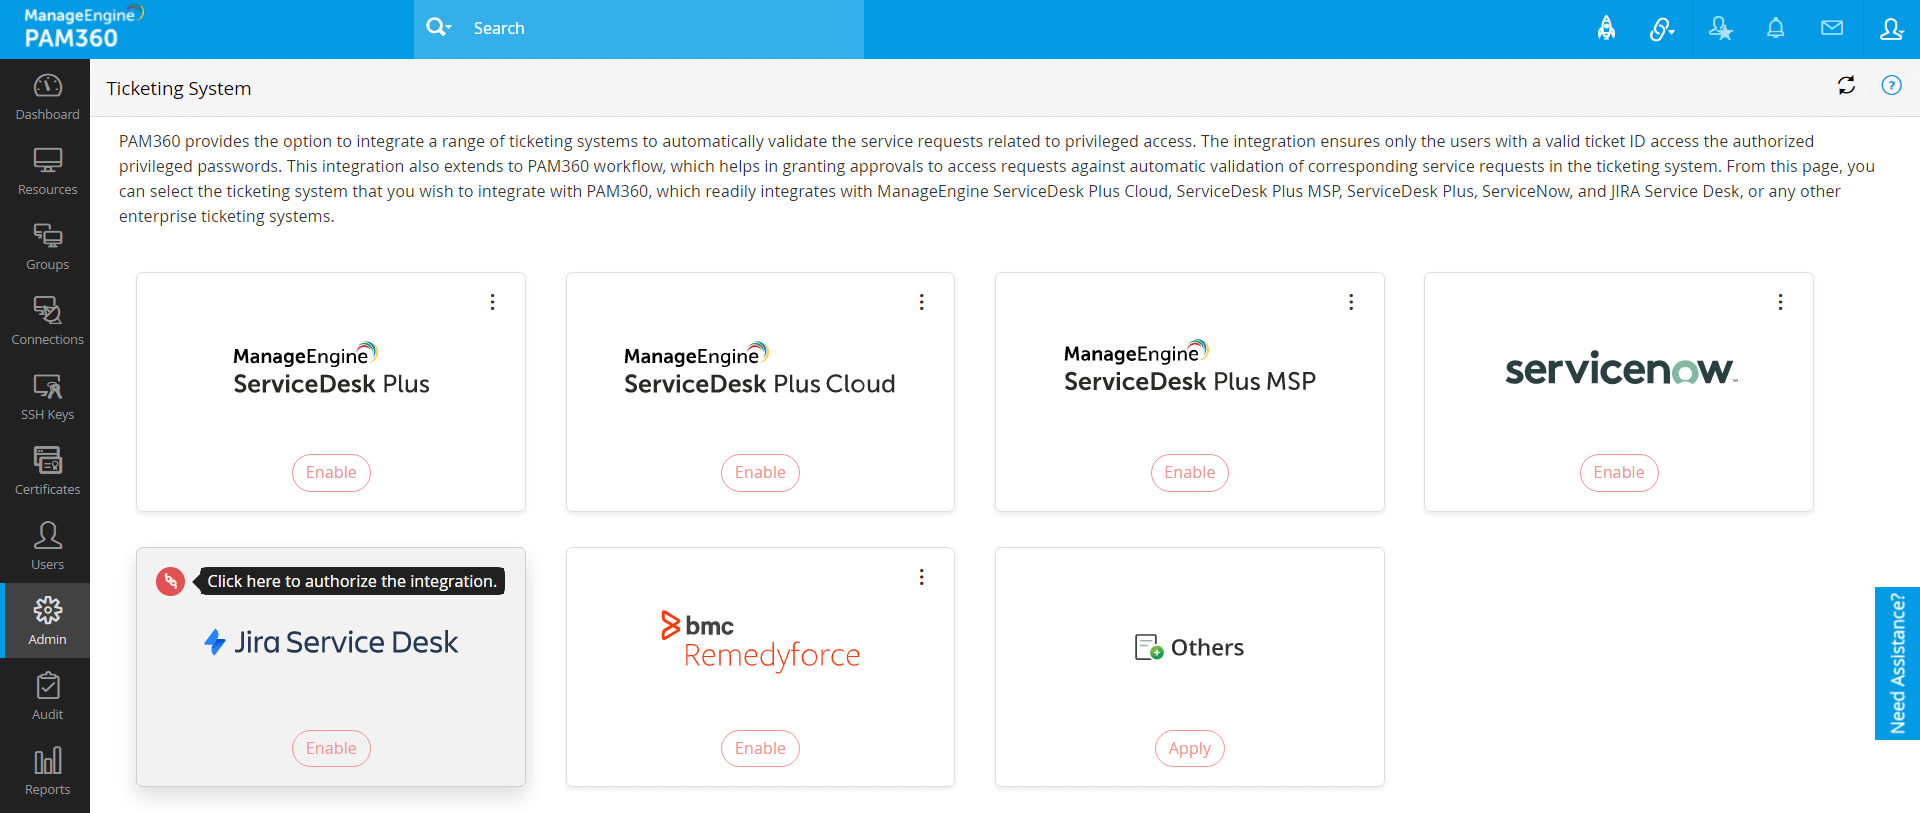
- In the UI that appears, read the conditions and click Accept to allow PAM360 to access
data.
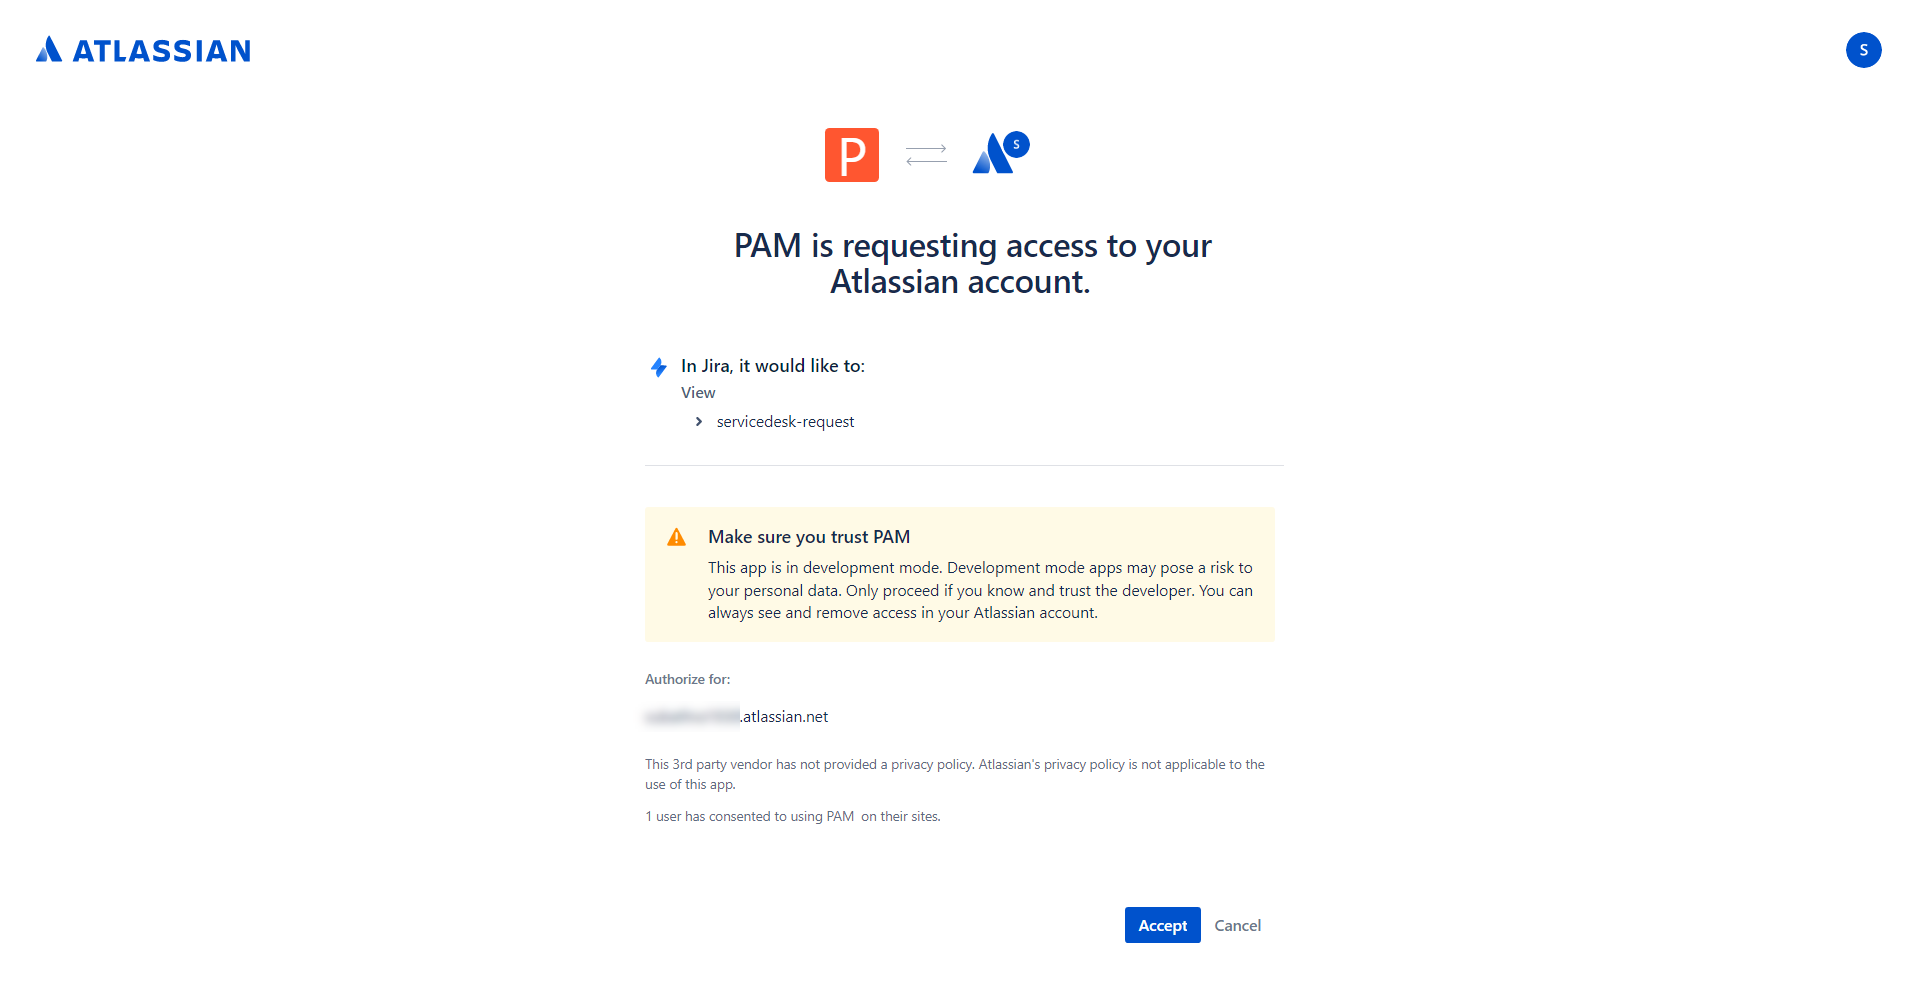
- You will now be redirected to PAM360 UI with a success message.
Jira Service Desk has been configured successfully as a ticketing system in PAM360.
3.2.6 BMC Helix Remedyforce
BMC Helix Remedyforce is a complete IT service management tool that includes Incident/Problem Management, Client Management, Service Management, Reports/Analysis, etc., that can be tailored to meet the requirements of enterprises. PAM360 now integrates with BMC Helix Remedyforce to provide automatic validation of service requests pertaining to privileged access. Users will have to submit valid ticket ID's to administrators to gain access to privileged passwords. Through automatic validation of the relevant service requests in the ticketing system, the integration assists in approving access requests.
Configuring BMC Helix Remedyforce in PAM360:
- Navigate to Admin >> Integrations >> Ticketing System.
- Click Enable under BMC Helix Remedyforce.
- In the pop-up that appears,
- Mention the Salesforce Username and Password.
- Mention the Security Token. To know more about Security Token, click here.
- Mention the Salesforce Instance Name URL as the Ticketing System URL.
- Click Enable.
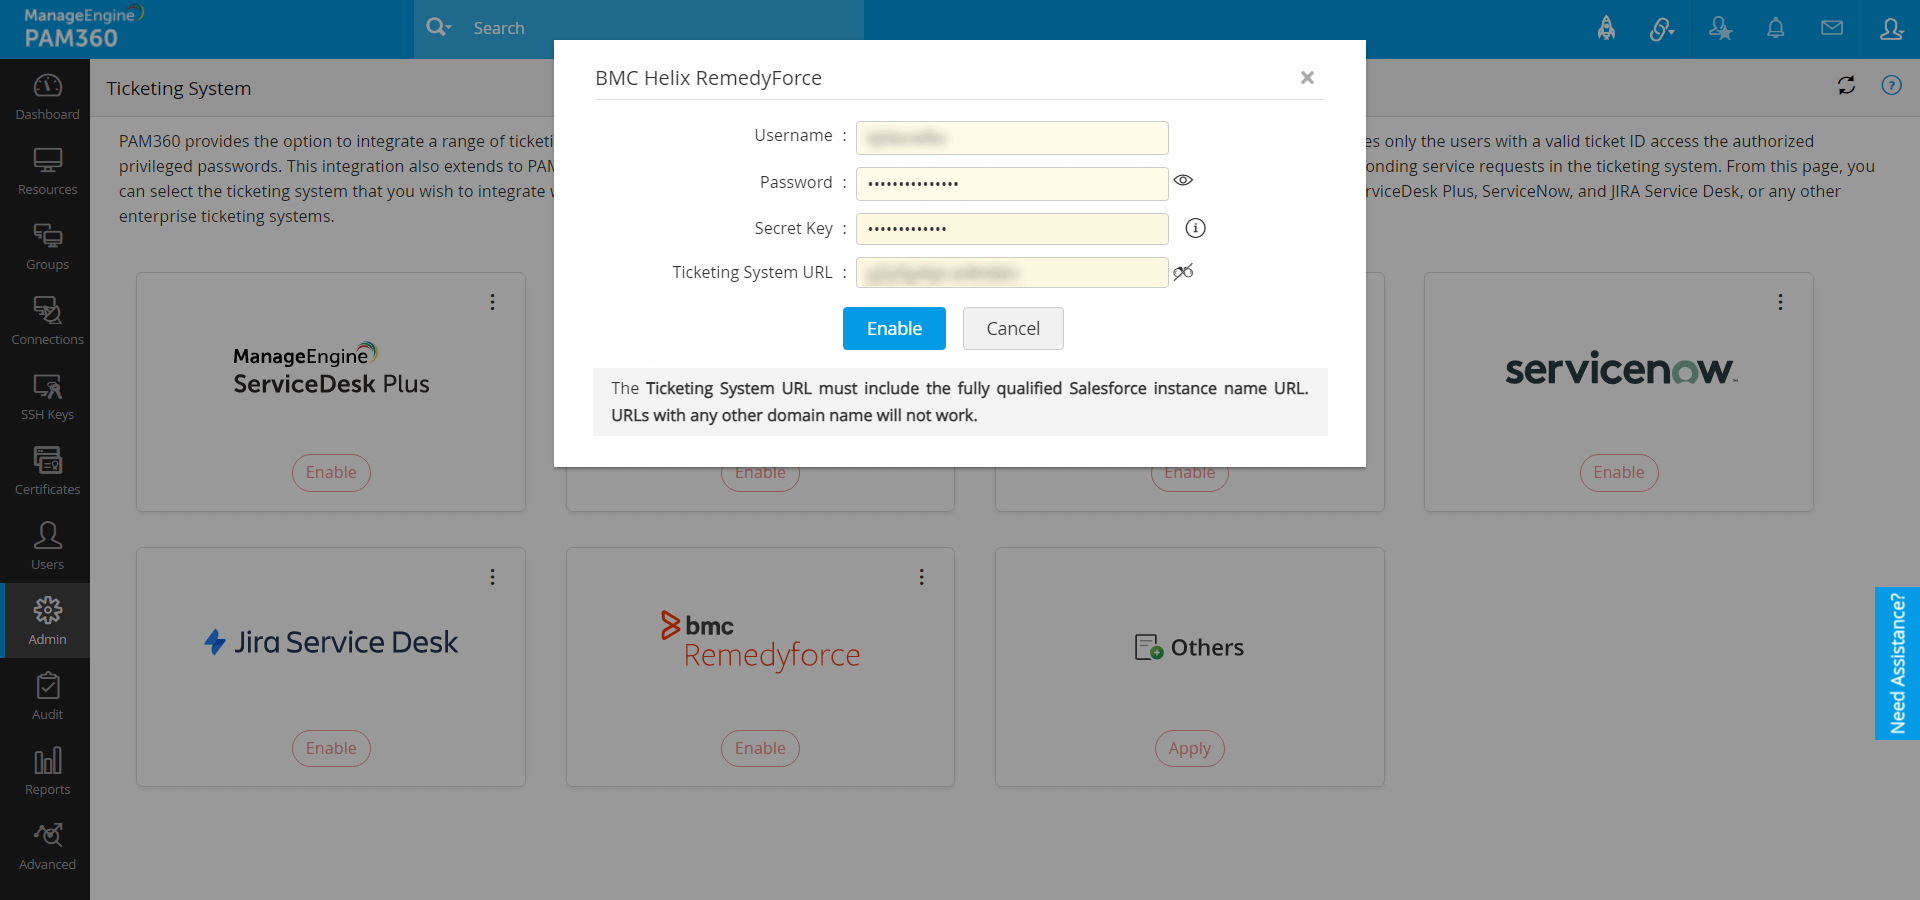
BMC Helix Remedyforce has been configured successfully as ticketing system in PAM360.
3.2.7 Others
If you are using any other ticketing system, you can integrate it with PAM360 by having your own custom implementation.
By default, PAM360 validates if the ticket ID entered by the user exists in the ticketing system and also verifies if the incident connected with the ticket is NOT in 'Closed' state. If your requirement is satisfied with these, ticketing system integration is complete.
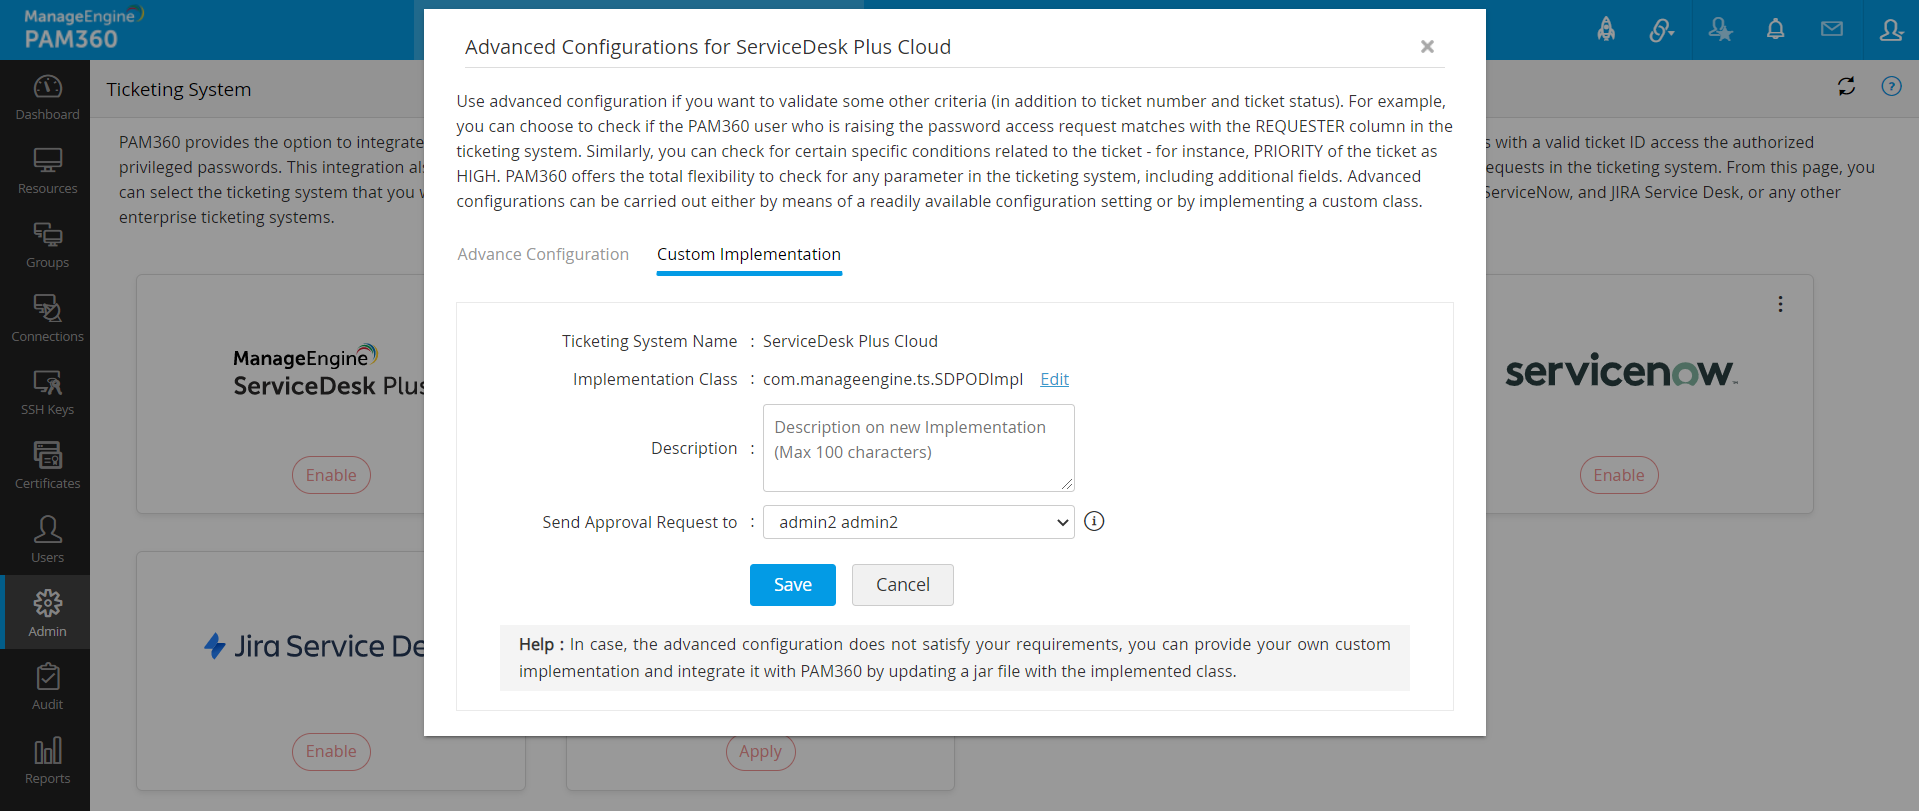
3.3 Optional Advanced Configurations
In case, you want to validate some other criteria (in addition to ticket number and ticket status), you have the option to configure advanced settings. For example, you can choose to check if the PAM360 user who is raising the password access request matches with the 'REQUESTER' column in the ticketing system. Similarly, you can check for certain specific conditions related to the ticket - for instance, 'PRIORITY' of the ticket as 'HIGH'. PAM360 offers the total flexibility to check for any parameter in the ticketing system, including additional fields.
To carry out advanced configurations,
- Click the three dots on top right corner and select Advanced Configuration.
- In the GUI that opens, Advanced configurations can be carried out either by means of a readily available
configuration setting or by implementing a custom class.

Options in Advanced Configurations:
- Validating if specific columns in PAM360 match with the ones you specify in the ticketing system
- Select Map Entries in PAM360 Vs Ticketing System to validate if specific columns in PAM360 match with the ones you specify in the ticketing system.
- The Column Name drop-down lists the column names as available in PAM360 - Resource Name, Resource Type, Account Name, PAM360 User Name, DNS Name, etc. (including custom fields).
- Select a Criteria to validate based on conditions such as is, is not, contains, does not contain, starts with or ends with.
- The Ticketing System column lists the fields (including custom fields) available in
the ticketing system. Choose the field, that has to be mapped with the corresponding field in
PAM360.
For example, you can choose to map RESOURCE NAME in PAM360 with ASSET in the ticketing system. Once you specify such a mapping, before granting access to the password, PAM360 will check if the RESOURCE NAME as specified in PAM360 matches with the ASSET name in the ticketing system. Only if the validation succeeds, access will be granted.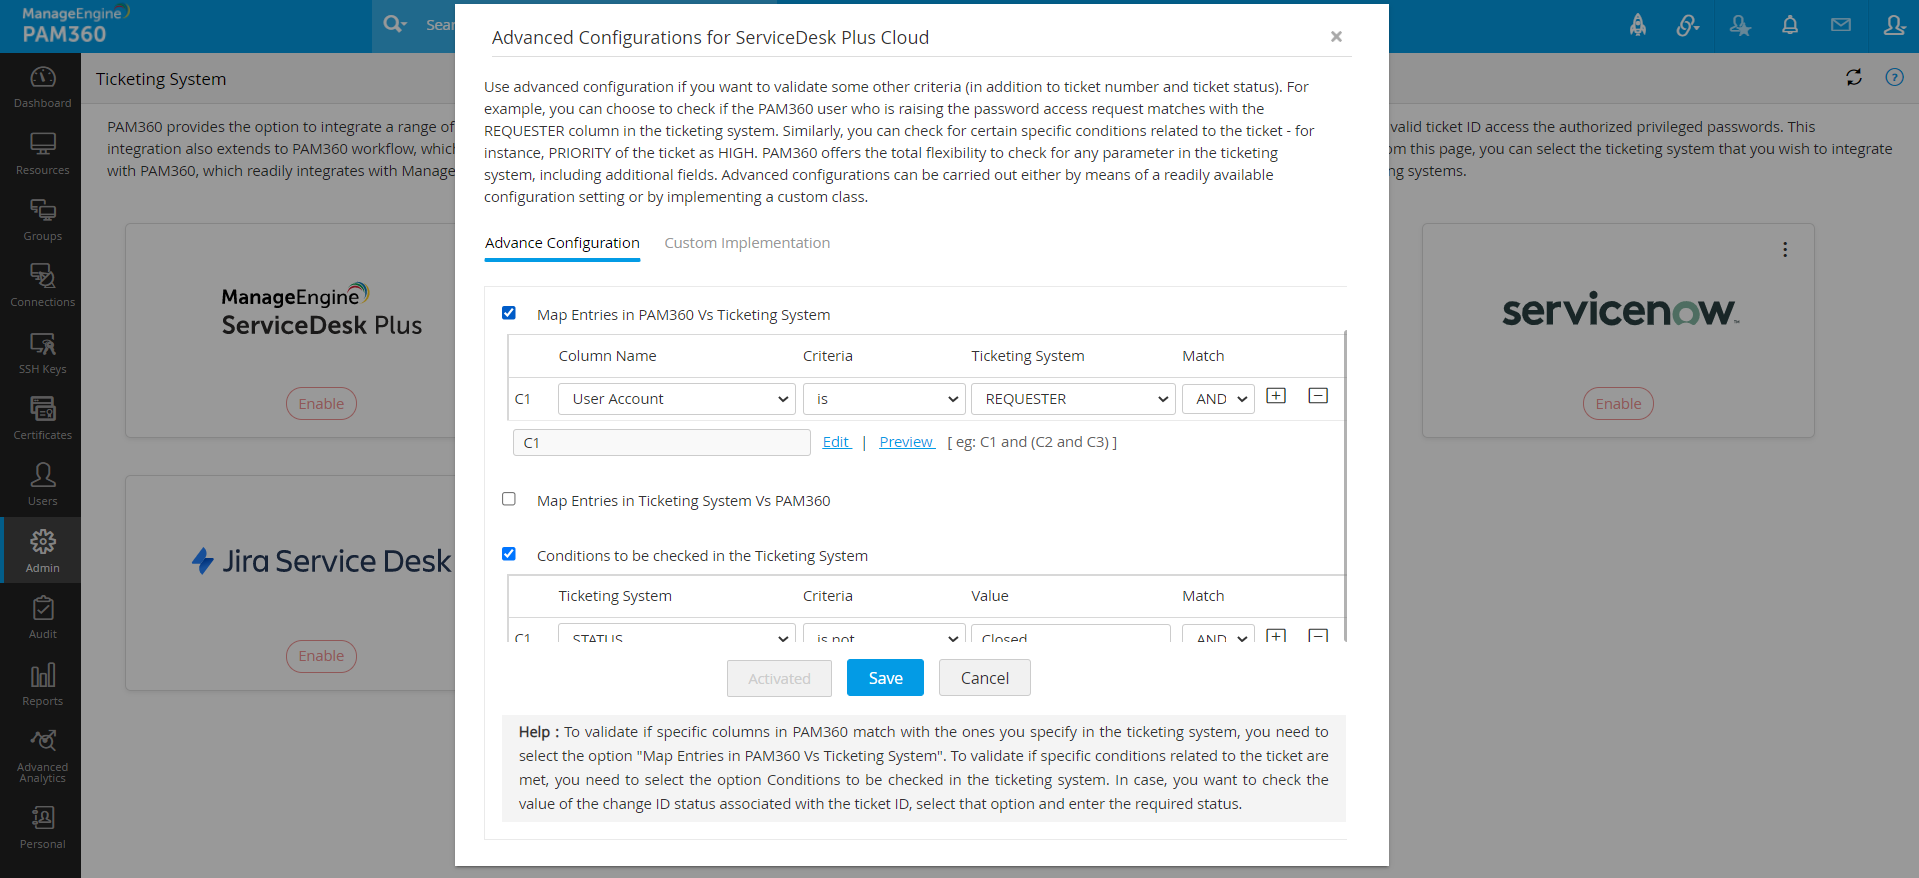
- Validating if specific columns in the Ticketing System match with the ones you specify in PAM360.
- Select Map Entries in Ticketing System Vs PAM360 to validate if specific columns in the ticketing system match with the ones you specify in PAM360.
- The Ticketing System column lists the fields (including custom fields) available in the ticketing system. Choose the field that has to be to be mapped with the corresponding field in PAM360.
- Select a Criteria to validate based on conditions such as is, is not, contains, does not contain, starts with or ends with.
- The Column Name drop-down lists the column names available in PAM360 such as: Resource Name, Resource Type, Account Name, PAM360 User Name, DNS Name, etc. (including custom fields).
- Validating specific conditions related to the ticket in the ticketing system.
- To validate if specific conditions related to the ticket are met, you need to select the option 'Conditions to be checked in the ticketing system'. By default PAM360 checks if the ticket STATUS is not in CLOSED state.
- You can select any number of additional conditions and PAM360 will validate all of them with the ticketing system. By default, PAM360 lists down all the fields available in the ticketing system, including the custom fields. You can specify the value, which PAM360 has to validate.
- Select to Check the value of change ID status associated with the ticket ID and mention the Change ID Status.
- Click Save to save changes to the ticketing system configurations.
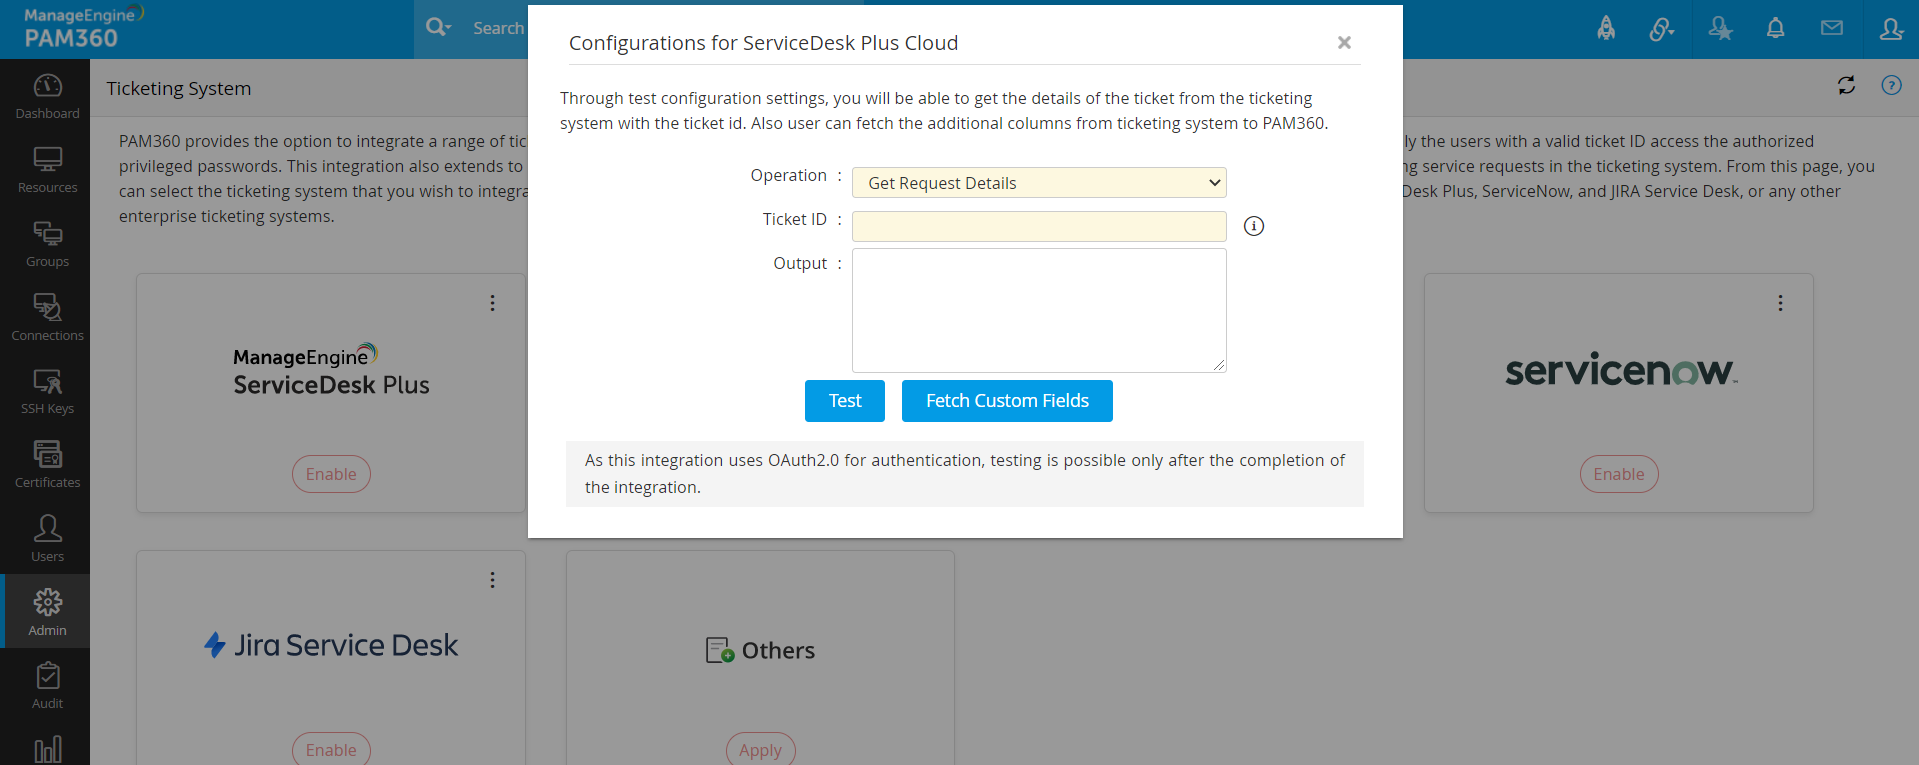
3.4 Test Ticketing System Configuration Setup
After completing the integration, you can do a testing to ensure if PAM360 is able to establish
communication with the ticketing system properly. Click the three dots on top right corner and
select Test Configuration Setup.
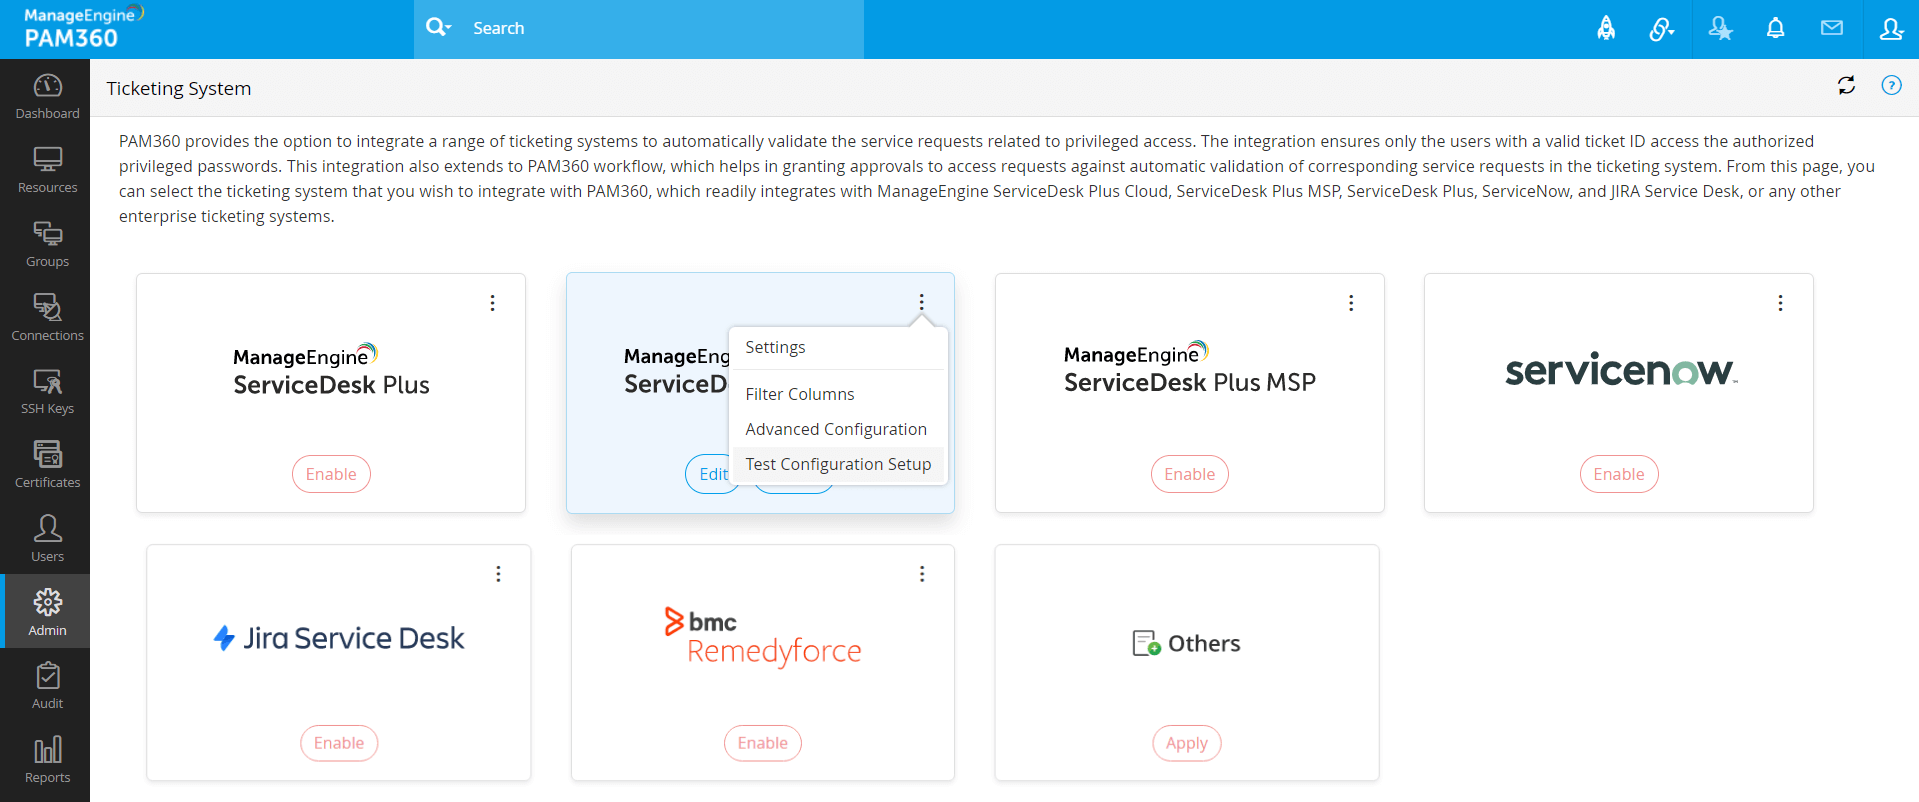
As part of this testing, you can also fetch the custom fields available in PAM360 to the advanced configuration setup.
3.5 Custom Implementation
In case, the advanced configuration does not satisfy your requirements, you can provide your own class implementation and integrate it with PAM360 by updating a jar file with the implemented class. For more details, refer to '' Integrating Other Ticketing Systems section below. The steps outlined there hold good here too.
4. Ticketing System Validation Enforcement and Exceptions
- Once you complete ticketing system integration, it takes immediate effect globally and users will have to produce valid ticket IDs to access passwords. By design, super administrators are exempted from ticket ID enforcement. In addition, as part of access control workflow too, users could be enforced to produce ticket IDs and access can be automatically granted after validating the IDs.
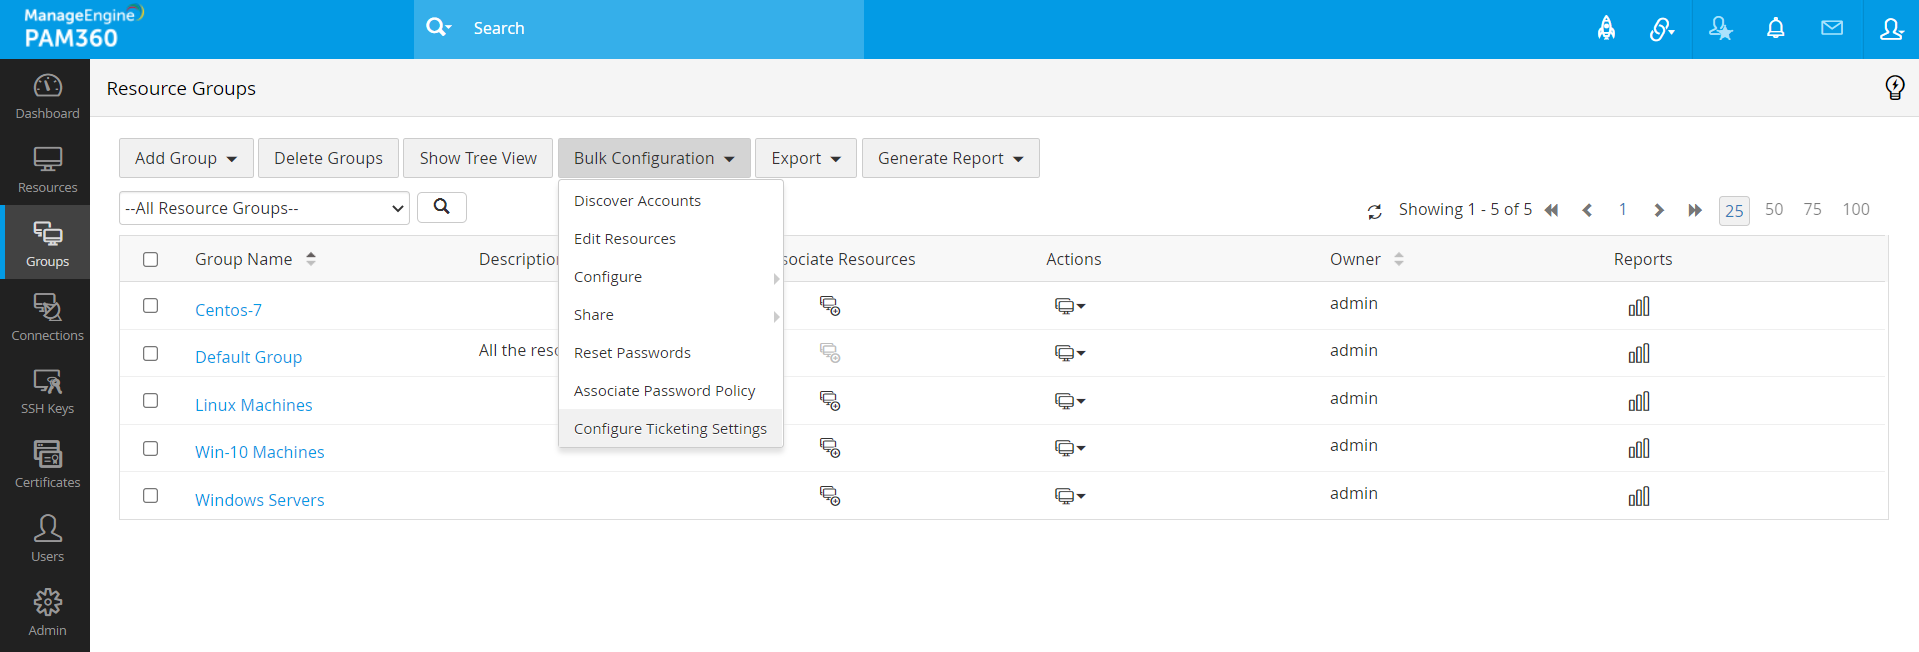
- You also have the option to selectively enable/disable ticketing enforcement for select resource groups.
- This can be done from Groups.
- Select the required resource group(s).
- Click on Bulk Configuration button at the top of the groups list and select
Configure Ticketing Settings from the dropdown.
- From General Settings, you can selectively allow/restrict users for ticketing
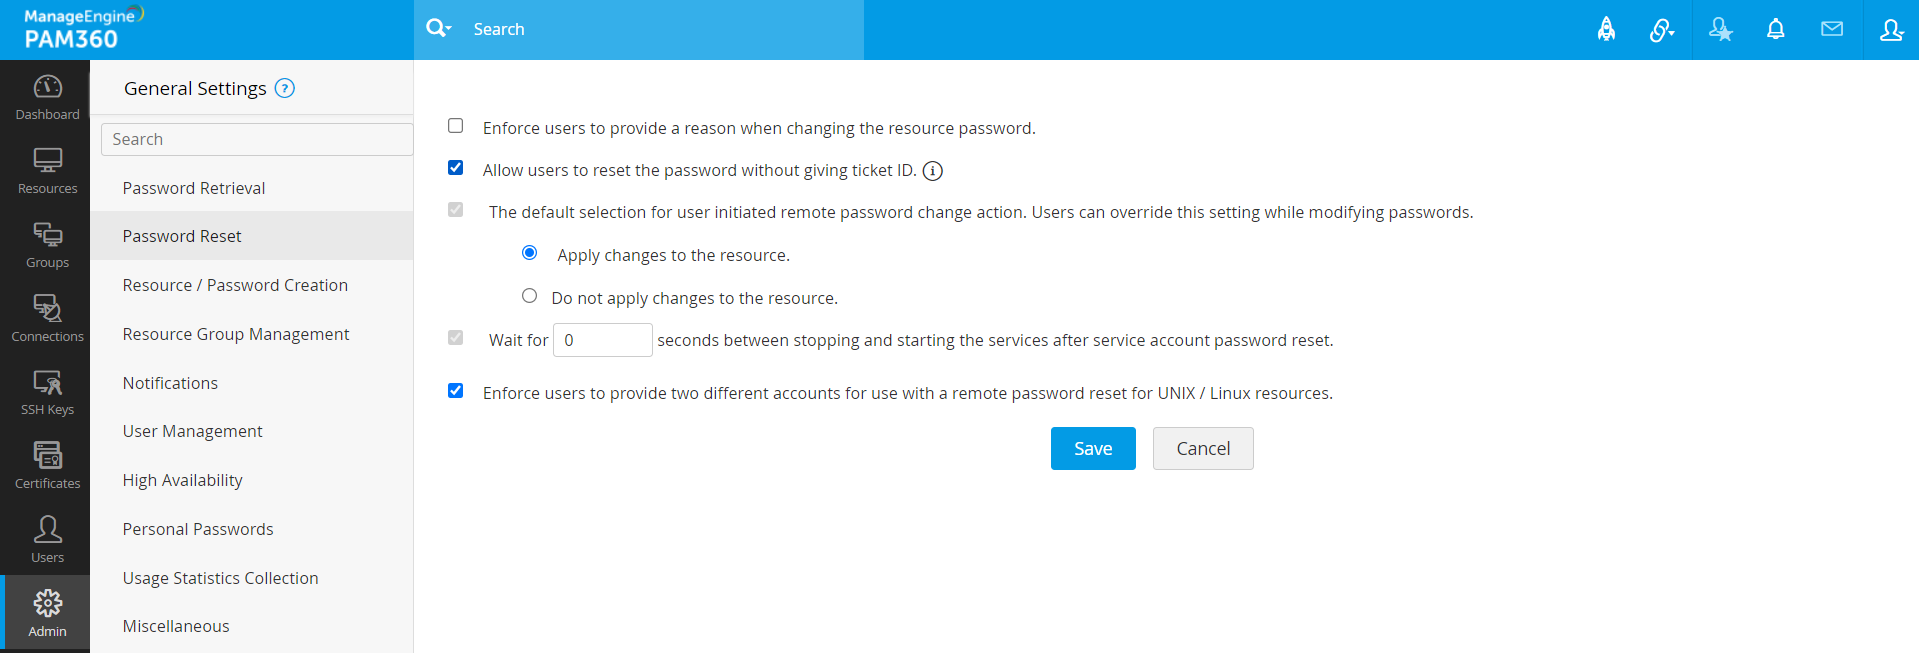
validation through the options Allow users to retrieve password without ticket ID under
Password retrieval section.
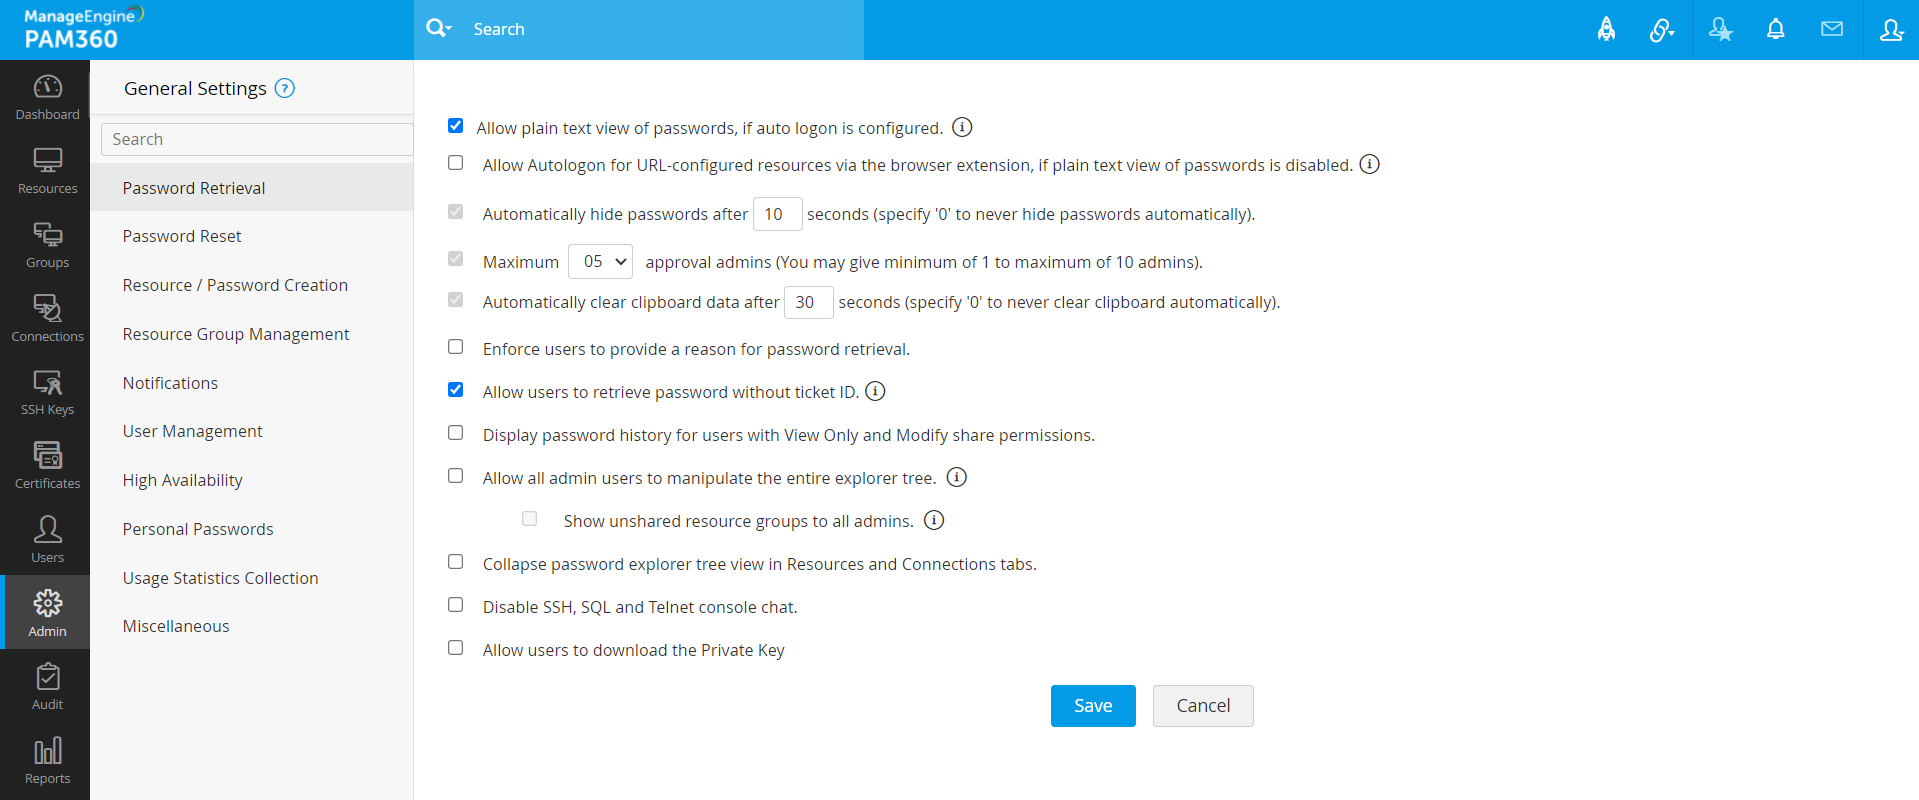
- And, Allow users to reset passwords without ticket ID from Password
Reset section.
- In addition, you can have user group-specific settings too, which can be done from the User Groups tab.
5. Disabling Ticketing System Integration
You can disable the integration with the ticketing system anytime. To disable/remove the integration from
PAM360,
- Click the Disable icon to disable the integration.
Note: The integration details will not be removed from PAM360 when the integration is disabled. You will be able to enable the integration at any given time.
- Click Remove to completely remove all the integration details from PAM360.
Note: To enable ServiceDesk Plus Cloud integration again, you have to generate a new set of Client ID, Client Secret as instructed in this step, and configure ServiceDesk Plus Cloud to PAM360.
6. Integrating Other Ticketing Systems
If you are using any other ticketing system, you can integrate it with PAM360 by having your own custom implementation. To guide you through the process, we have taken integrating Zendesk as an example to explain the steps involved.
Step 1: Create your implementation class
Refer to the sample implementation class created for integrating Zendesk. The important aspects of the implementation class have been explained below:
Generate Authentication Token
The first step is to generate authentication token of the ticketing system to enable PAM360 establish connection. When generating the AUTH TOKEN, ensure that you provide the credentials of an administrator who has full access to the ticketing system. You can do this either by providing the credentials directly in the implementation class or by generating the token and putting the token.
The snippet below shows how to generate Base64 Authstring belonging to a privileged account of the ticketing system. This will come in handy when the REST API is based on Base64 Authorization header. Some ticketing systems offer AUTH-Token with inbuilt GUI. In such cases, you can directly use the authentication parameters. In addition, instead of hard coding username and password in the implementation class, you can very well skip this part and make REST API call with direct Base64 token that are generated through Java or through any online editors.
Refer to the code snippet below:
// Constructing Authstring from Zendesk login credentials
String username = "username@example.com"; //Zendesk username
String password = "zendeskpassword"; //Zendesk password
Base64 encoder = new Base64();
byte[] encodedPassword = (username + ":" + password).getBytes();
byte[] encodedString = encoder.encodeBase64(encodedPassword);
String authStr = new String(encodedString);
Step 2: Check connection with ticketing system
Using REST APIs, PAM360 can be made to get the information about tickets from the ticketing system. Each ticketing system follows its own procedure to disseminate ticket details. Refer to the respective documentation to identify the procedure. After obtaining the ticket details, you need to validate the details.
Refer to the code snippet below:
String sUrl = "https://<zendesk-instance>.zendesk.com/api/v2/tickets/"; //REST API call Zendesk
sUrl = sUrl + ticketId +".json"; //This is the ticket ID that will be validated against the one supplied by the user in PAM360
URL url = new URL(sUrl);
HttpsURLConnection connection = (HttpsURLConnection) url.openConnection();
connection.setRequestProperty("Authorization","Basic "+authStr); //Setting Authstring in the header
Step 3: Validating if specific columns in PAM360 match with the ones you specify in the ticketing system (optional configuration)
Refer to the code snippet below to validate if specific columns in PAM360 match with the ones you specify in the ticketing system (For example, you can choose to map RESOURCE NAME in PAM360 with the SUBJECT in the ticketing system. Once you specify such a mapping, before granting access to the password, PAM360 will check if the RESOURCE NAME as specified in PAM360 matches with the SUBJECT name (if the subject contains the resource name) in the ticketing system. Only if the validation succeeds, access will be granted):
String assetName = (String)pam360Columns.get("Resource Name");//PAM360 Asset Name for which password related operation done
String subject = (String)ticket.get("subject");//Getting the ticket subject
boolean descriptionCheck = subject.toLowerCase().contains(assetName.toLowerCase());
//Checking the description of the ticket contains the resource name of user account
Step 4: Validating specific conditions related to the ticket in the ticketing system (optional configuration)
You can validate if specific conditions related to the ticket are met - by default, PAM360 checks if the ticket STATUS is not in CLOSED state. You can select any number of additional conditions and PAM360 will validate all of them with the ticketing system. By default, PAM360 lists down all the fields available in the ticketing system, including the custom fields. You can specify the value, which PAM360 has to validate.
JSONObject ticket = (JSONObject)ticketingOuput.get("ticket");
String status = (String)ticket.get("status");
boolean statusCheck = "open".equalsIgnoreCase(status); //Checking whether the status of the ticket is in open state
Step 5: Compilation
While compiling keep the following jars in the classpath (the jars are available under <PAM360_HOME>\lib folder)
- AdventNetPassTrix.jar;
- json_simple-1.1.jar;
- commons-codec-1.7.jar
For Example,
javac -d . -cp AdventNetPassTrix.jar;json_simple-1.1.jar;commons-codec-1.7.jar ZendeskImpl.java - (For Windows)
javac -d . -cp AdventNetPassTrix.jar:json_simple-1.1.jar:commons-codec-1.7.jar ZendeskImpl.java - (For Linux)
Step 6: Configurations in PAM360 installation
- Compile the implemented class files as a single jar and place that jar in PAM360_HOME\lib folder.
- Restart the PAM360 Service so that PAM360 will make use of the implemented class.
- Navigate to Admin >> Integration >> Ticketing System Integration.
- In the GUI that opens, select the option 'Other' (to integrate any ticketing system) OR the 'Class Implementation' 'Advanced Configuration' of the already integrated ticketing system (if you want to extend the functionality).
- Specify the name of your implementation class.
- Your implementation has to be approved by another administrator. All other administrators (other than those who made the request) will receive an alert regarding the request for approval.
- Once an admin approves the implementation, it will be made available for use.
- After enabling, ticketing system workflow will be made mandatory for password retrieval and password reset.
For further information, refer to the sample implementation class created for integrating Zendesk.
Implementation tips:
For steps 3 and 4 above, you might require additional information for implementation. Refer to the tips below for details:
Columns in PAM360
List of data related to the user account for which ticketing request is raised through pam360Columns parameters from PAM360 side:
PAM360 User Name - Logged in user name
Resource Name - Name of the resource
DNS Name - IP Address of the resource
User Account - Account name
Resource Type - Type of the resource being accessed (Windows/ WindowsDomain/ Linux etc.)
Resource Description - Description about the resource
Department - Department to which the resource belongs
Location - Resource location
Domain Name - Domain name of the resource
Request Type - Request Type for which ticketing system call is made. It can be
RETRIEVAL - Password access
REQUEST - Password access request raised through Access-Control workflow
RESET - Password reset
AUTOLOGON - 'Open Connection' request
User Organization Name - Organization name of the user who made the request
User Current Organization Name - Name of the organization where the requested account is present
Other than this, all additional columns will be sent as shown below:
Resource additional field - Resource@<field_name>
Account additional field - Account@<field_name>
Credentials to Access Ticketing System
AUTHTOKEN - Authentication token value given in the integration GUI
TICKETINGSYSTEMURL - URL given in the integration GUI
Advanced Configuration Details:
ISPAM360TICKETCRITERIA - To check if PAM360 vs Ticketing system is configured or not
(Boolean - true or false)
PAM360TICKETCRITERIACOLUMNS - Mapping details between PAM360 and ticketing system. Each element in the array represents a criteria. For example, the column 'User Account' in PAM360 has to be validated against Ticketing system column 'REQUESTER' with match parameter 'EQUAL' in criteria 'C1'
JSONArray - [ ["C1","User Account","REQUESTER","EQUAL"],
["C2","PAM360 User Name","TECHNICIAN","EQUAL"] ]
PAM360TICKETCRITERIA - Specifies the relationship between different criteria.Each element of 'PAM360TICKETCRITERIACOLUMNS' contains the first parameter as criteria name. It gives the relationship between criteria
(String - Example: C1 or C2)
ISTICKETVALUECRITERIA - To check if the validation for ticketing system values is configured or not
(Boolean - true or false)
TICKETVALUECRITERIACOLUMNS - Mapping details that ticket should satisfy. Each element in the array represents an criteria. For example, ticket column 'STATUS' has to be validated against value other than 'Closed' in criteria 'C1'
JSONArray - [ ["C1","STATUS","Closed","NOT_EQUAL"],
["C2","URGENCY","high","EQUAL"],
["C3","IMPACT","high","EQUAL"] ]
TICKETVALUECRITERIA - Specifies the relationship between different criteria. Each element of 'TICKETVALUECRITERIACOLUMNS' contains the first parameter as criteria name. It gives the relationship between criteria
(String - Example: C1 or (C2 and C3)
ISTICKETCHANGEIDSTATUS - To check if the validation for system change status check is
configured or not (true or false)
TICKETCHANGEIDSTATUS - Associated 'change ID status' of the ticket ID value
Match Parameters:
EQUAL - Values of two parameters should be same
NOT_EQUAL - Values of two parameters should not be same
CONTAINS - First parameter value should contain the value of second parameter
NOT_CONTAINS - First parameter value should not contain the value of second parameter,
STARTS_WITH - First parameter must start with value of second parameter,
ENDS_WITH - First parameter must end with value of second parameter,
(Date based comparison parameters)
LESS_THAN - First parameter date value should be less than the second one,
GREATER_THAN - First parameter date value should be greater than the second one,
LESS_THAN_EQUAL - First parameter date value should be less than or equal to the second
one,
GREATER_THAN_EQUAL - First parameter date value should be greater than or equal to the second
one
Depending on the match parameters, the criteria should get validated.
7. Code Snippet For ServiceNow Custom Implementation
If the advanced configuration does not satisfy your requirements, you can have a custom implementation. You can extend the default implementation provided by PAM360 and have the additional functionalities. The following example shows how the default implementation created for ServiceNow, can be extended to serve as the custom implementation.
package com.manageengine.ts;
import java.util.Properties;
import org.json.simple.JSONObject;
import com.adventnet.passtrix.helpdesk.ServiceNowImpl;
//ServiceNow custom implementation
public class ServiceNowCustomImpl extends ServiceNowImpl
{
public boolean checkViewHelpDeskRequest(String ticketId, Properties pam360Columns, Properties credentialDetails, JSONObject criteriaDetails)
throws Exception
{
boolean result = super.checkViewHelpDeskRequest(ticketId, pam360Columns, credentialDetails, criteriaDetails);
//Your own implementation
return result;
} }
The table below lists down default functionality processing classes for the ticketing systems that
readily integrate with PAM360:
|
ServiceDesk Plus On-Demand |
|
|
ServiceDesk Plus MSP |
com.adventnet.passtrix.helpdesk.ServiceDeskPlusMSPImpl |
|
ServiceDesk Plus |
com.adventnet.passtrix.helpdesk.ServiceDeskPlusOnPremiseImpl |
|
ServiceNow |
com.adventnet.passtrix.helpdesk.ServiceNowImpl |
|
JIRA |
com.adventnet.passtrix.helpdesk.JiraServiceDeskImpl |
8. Interface Description
The interface for ticketing system integration:
package com.manageengine.ts;
import java.util.Properties;
import org.json.simple.JSONObject;
// This class provides the methods to implement ticketing system integration. You need to implement this interface
public interface TicketingSystemInterface
{
/**
* Used to display the error message while doing the ticketing system related operations. The output gets reflected in audit trails.
* @return Error message, if the ticketing system accessible, return null. Otherwise, return a proper error message.
*/
public String getErrorMsg();
/**
* Used to return the properties related to the ticketing system operation
* @return Comments and needed message
*/
public Properties getRequestProperties();
/**
* Used for testing configuration setup. While testing, administrator will be able to get ticket details from the ticketing system.
* @param tsName Ticketing system Name
* @param tsUrl Ticketing system Web URL
* @param authToken Authentication Token assigned to a technician of ticketing system (Base64 authorization string constructed
using login credentials in the case of ServiceNow ticketing system)
* @param ticketId Ticket ID given as the input ((Ticket ID/Sys ID in the case of ServiceNow ticketing system)
* @param Ticketing System operation type
* {@value 0} Ticketing Operation
* {@value 1} Change Related Operation
* @return the output from ticketing side
* @throws Exception
*/
public JSONObject helpdeskCheck(String tsName, String tsUrl, String authToken, String ticketId, String operation) throws Exception;
/**
* Actual function that will be called upon whenever a ticketing system related operation is done from PAM360 GUI
* @param ticketId Ticket ID (Ticket ID/Sys ID in the case of ServiceNow ticketing system)
* @param pam360Columns Details of the PAM360 account for which ticketing system query is raised
* @param credentialDetails Key details of ticketing system (Authentication token or Base64 authorization string
and web URL of ticketing system)
* @param criteriaDetails Criteria mapping done as part of advanced configuration
* @return Final output that will be sent to PAM360 server
* {@value true} Success case - Allows the operation to proceed
* {@value false} Failure case - Denies the operation to proceed
* @throws Exception
*/ public boolean checkViewHelpDeskRequest(String ticketId, Properties pam360Columns, Properties credentialDetails, JSONObject criteriaDetails)
throws Exception; }