ManageEngine® PAM360 Migration Pack Download

The latest PAM360 version is   ( ). For migration instructions, click here.

Download Migration Pack

Note: We strongly recommend you to take a backup before the migration to use if there is any accidental loss of data.

From PMP 12410 to PAM360 6600

SHA256 Checksum:
986b187201c8ba695f295154ebe26d36d5d682c2ac97491ee5e2a54079732dad

From PMP 12330 to PAM360 6400

SHA256 Checksum:
f3b2f319241cfe426696b3d39aae4a040674fd42af63917a68d72307a02c01b8

From PMP 12230 to PAM360 6000

SHA256 Checksum:
21549610a51fff1c4aea9764b1b1513dd319c17e2fe20ee6bc3890c7be6a9f8a

From PMP 12124 to PAM360 5800

SHA256 Checksum:
9d223ee2ab19132570230e7a00e67da1d85fd9dc56a140726c3c00fad1f5c3ff

From PMP 12122 to PAM360 5712

SHA256 Checksum:
e813689cafdc73b24c7660d6ee368c4562b57558194033d8595d7daf9f2e545c

From PMP 12122 to PAM360 5711

SHA256 Checksum:
62e589fee41e5e0b4c58a88fccf9614bbce16095e96776a95c62462a5dd68f3e

From PMP 12121 to PAM360 5710

SHA256 Checksum:
cf2fb555cea7dc61556d5be6944bbb4b407aa695103ec25b6c9f0da482dbfb5e

From PMP 12121 to PAM360 5700

SHA256 Checksum:
d5e58fe3bcb5a8857586e5f75024ece5b3f3a35e75e7d743624c0d34ea53d4f0

From PMP 12110 to PAM360 5550

SHA256 Checksum:
7d0753ace7bf23946898413840340958803b45fece9ff5338f7c3eff380181d5

From PMP 12101 to PAM360 5520

SHA256 Checksum:
2766cb0d7a75499c990242b520bb245abfa550d4c252db3f22826ee0c3d82e4f

From PMP 12100 to PAM360 5510

SHA256 Checksum:
fc1e7dc64291663fd797aa83c4facf337f1317108a3bdbf47e68ca8a8ef6f276

From PMP 12100 to PAM360 5500

SHA256 Checksum:
c5189bce6e1ec31667f7c902e7174f73d7a31ba0cc39e7f4a66daa90b792ac7d

Note: If you are migrating from Password Manager Pro to PAM360 and your cloud storage is in Dropbox, kindly reconfigure the PAM360 storage in Dropbox.

From PMP 12004 to PAM360 5401

SHA256 Checksum:
be987d33e28a1b5591c0a954bd962f8e1177a98c705c441cfca08c8ff6a5157b

From PMP 12004 to PAM360 5400

SHA256 Checksum:
d7d8f4ba9f256f589febb4c6fd6881bba8e6890fa25f8e1a40e1f5ac551bf868

From PMP 11301 to PAM360 5306

SHA256 Checksum:
854cbbda4196695becc6266de93b1335d80489c23fd83c306b91051480d2814b

From PMP 11300 to PAM360 5300

SHA256 Checksum:
513da1c91a74c528d242bd809baf0f099a1c8014d2f16f94949ddf247171ac07

From PMP 11200/11201 to PAM360 5200

SHA256 Checksum:
06d6aa0e39c4d2cdb10bc08d453e8a7b3bb0c677a694d7e22e67364e2ac37ccf

From PMP 11003 to PAM360 5100

SHA256 Checksum:
1c487068cdb09a036da74e67b51e7aa7cfa5809972a38dfa066e19dceaae5633

From PMP 11003 to PAM360 5003

SHA256 Checksum:
e1073dbd0cc4f8992d385867e5941b77f1ab5ae9ebefc9dc2d62a81a49ab546d

From PMP 11002 to PAM360 5000

MD5SUM:
2795702ec99f961ddc8f651de76a8e1a

How do I find my build number?

Log in to Password Manager Pro using Privileged Administrator or Administrator account. Access the 'About' option from the user profile menu present at the top right corner of the web interface to know the build number and the version number of your current Password Manager Pro installation.

Instruction to apply the Migration Pack


Windows (PostgreSQL)

  • Backup the current entire Password Manager Pro installation and store it in a folder separately. You can revert to this installation with your settings intact if something goes wrong with the migration.
  • Now, to begin the upgrade, stop the Password Manager Pro service and exit the tray icon.
    Note: In case if you have stored the 'database_params.conf' file in a different location, first copy the file back to the original path, i.e., '<PMP Installation Folder>/conf/' before commencing the upgrade.
  • Shut down the Password Manager Pro service - both primary and secondary, if running. Also, use Task Manager to ensure if the PostgreSQL process is not running.
  • Rename the directory from <PMP Installation Directory>/webapps/PassTrix to <PMP Installation Directory>/webapps/PAM360.
  • Right-click on the Command Prompt and 'Run as Administrator'.
  • Navigate to the '<PMP_Installation_Folder>/bin' directory from the Command Prompt and execute 'UpdateManager.bat'.
    Update Manager
  • Click Browse and select the .ppm file that you downloaded. As a part of patch integrity verification from PAM360 build 5400 onwards, PAM360 requires an SSL certificate to complete the upgrade process. PAM360 will automatically import this certificate during the upgrade. In case the automatic import does not happen, you will be prompted to manually add the SSL certificate. Click here to download the SSL certificate to be imported during the version upgrade.
  • In this case, when the Import Certificate pop-up opens, click Browse and import the SSL certificate you downloaded from the aforementioned page.
    Import Certificate
  • Click Install in the Update Manager window to begin the upgrade process. Please note that importing the SSL certificate is mandatory while upgrading PAM360 to version 5.4. However, this is a one-time operation and you need not repeat the process during the next version upgrade.
  • After applying the upgrade packs, start the database using 'startDB.bat'.
  • Copy 'updateDBName.bat' from <PMP Installation Directory>/bin to '<PMP Installation Directory>/pgsql/bin'.
  • To decrypt the database password contact pam360-support@manageengine.com.
  • From the Command Prompt, go to the location '<PMP Installation Directory>/pgsql/bin' and execute 'updateDBName.bat'.
  • To rename the service, execute sc config PMP displayname="ManageEngine PAM360" from Command Prompt.
  • Now start the ManageEngine PAM360 service.
  • If you need any assistance or clarifications, please contact pam360-support@manageengine.com.
 

Windows (MS SQL)

  • Backup the current entire Password Manager Pro installation and store it in a folder separately. You can revert to this installation with your settings intact if something goes wrong with the upgrade. Also, take a backup of the Password Manager Pro database.
  • Now, to begin the upgrade, stop the Password Manager Pro service and exit the tray icon.
  • Shut down the Password Manager Pro service - both primary and secondary, if running.
  • Additionally, if you have configured High Availability, it is required to delete the 'subscriptions' and 'publications' related to the product replication data and also disable 'publishing and distribution'. To do this, log in to the MS SQL Server management studio and delete the files/folders as explained in the screenshots below. Skip this step if High Availability is not configured.

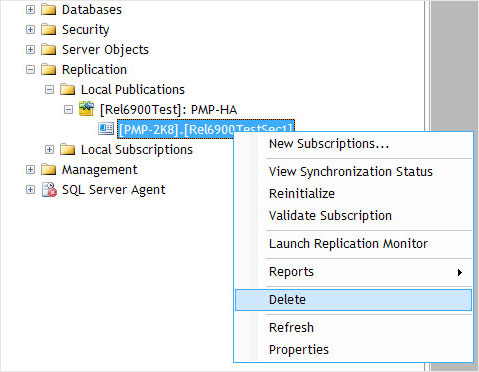
1. Deleting Subscription
First, navigate to Replication >> Local Publications >> <Name of PMP database:PMP-HA>. You will see a file with <PMP server name>. <Name of PMP database>. Right click the file and press 'Delete' in the menu.


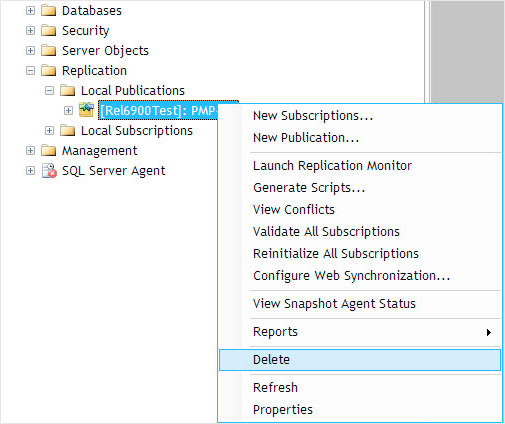
2. Deleting Publication
Then, navigate to Replication >> Local Publications >> <Name of PMP database:PMP-HA>. Right click the folder <Name of PMP database:PMP-HA> and press 'Delete' in the menu.


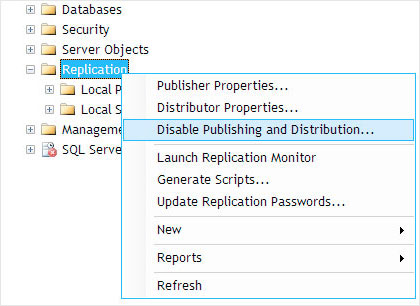
3. Disabling Publishing   Distribution
Then, right click the 'Replication' folder and click the option "Disable Publishing and Distribution".


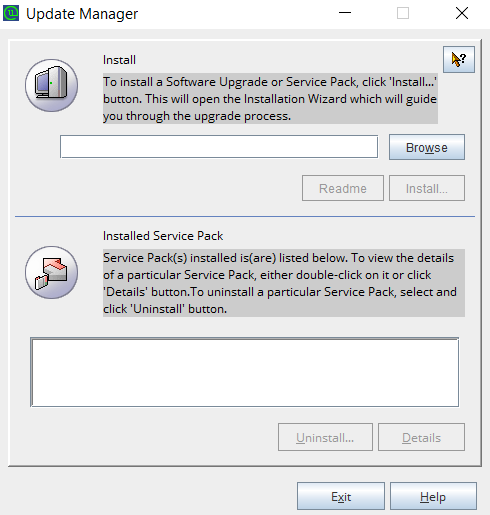
Once you have completed the above steps related to MS SQL server, you can proceed to applying the upgradepack.

Applying Upgrade pack

  • Rename the directory from '<PMP Installation Directory>/webapps/PassTrix' to '<PMP Installation Directory>/webapps/PAM360'.
  • From the Command Prompt, go to the '<PMP_Installation_Folder>/bin' directory and execute 'UpdateManager.bat'.
  • If you had opted for 'Windows Authentication' during the MS SQL server configuration for Password Manager Pro, start the Command Prompt using the service account used to configure the Password Manager Pro service to connect to the SQL server. In other words, instead of running as Administrator, run as the service account.
  • To identify whether the account used is a service or an SQL account, go to the '<PMP_Installation_Folder>/conf' directory and open the 'database_params.conf' file. If you do not find a username and password in the file, then Password Manager Pro is using Windows Authentication, which means you need to run the Command Prompt with the service account privilege.
  • Click Browse and select the .ppm file you downloaded.
    Update Manager
  • As a part of patch integrity verification from PAM360 build 5400 onwards, PAM360 requires an SSL certificate to complete the upgrade process. PAM360 will automatically import this certificate during the upgrade. In case the automatic import does not happen, you will be prompted to manually add the SSL certificate. Click here to download the SSL certificate to be imported during the version upgrade.
  • In this case, when the Import Certificate pop-up opens, click Browse and import the SSL certificate you downloaded from the aforementioned page.
    Import Certificate
  • Click Install in the Update Manager window to begin the upgrade process. Please note that importing the SSL certificate is mandatory while upgrading PAM360 to version 5.4. However, this is a one-time operation and you need not repeat the process during the next version upgrade.
  • To rename the service, execute sc config PMP displayname="ManageEngine PAM360" from Command Prompt.
  • Now start the ManageEngine PAM360 service.
If you need any assistance or clarifications, please contact pam360-support@manageengine.com.
 

Linux(Headless)

  • Backup the current entire Password Manager Pro installation and store it in a folder separately. You can revert to this installation with your settings intact if something goes wrong with the upgrade.
  • Now, to begin the upgrade, stop the Password Manager Pro service using the command '/etc/init.d/pmp-service stop'.
    Note: In case if you have stored the 'database_params.conf' file in a different location, first copy the file back to the original path, i.e., '<PMP Installation Folder>/conf/' before commencing the upgrade.
  • Shut down the Password Manager Pro service - both primary and secondary, if running. Also, use Task Manager to ensure if the PostgreSQL process is not running.
  • Rename the directory from <PMP Installation Directory>/webapps/PassTrix to <PMP Installation Directory>/webapps/PAM360.
  • From the Terminal, navigate to the '<PMP_Installation_Folder>/bin' directory.
  • Execute the command 'sh UpdateManager.sh -c' (To run the Update Manager in the CLI mode).
  • Now, press i to install. Supply full path of the upgrade pack.
  • As a part of patch integrity verification from PAM360 build 5400 onwards, PAM360 requires an SSL certificate to complete the upgrade process. PAM360 will automatically import this certificate during the upgrade. In case the automatic import does not happen, you will be prompted to manually add the SSL certificate. Click here to download the SSL certificate to be imported during the version upgrade.
  • Enter the SSL certificate's absolute path when prompted. Once the certificate is imported successfully, wait for the upgrade to complete until the message "Service Pack applied successfully" is displayed. Please note that the SSL certificate import is a one-time operation and you need not repeat the process during the next version upgrade.
  • After applying the upgrade packs, start the database using the command 'sh startDB.sh'.
  • Copy 'updateDBName.sh' from '<PMP Installation Directory>/bin' to '<PMP Installation Directory>/pgsql/bin'.
  • From the Command Prompt, go to the location '<PMP Installation Directory>/pgsql/bin' and execute 'sh updateDBName.sh'.
  • To decrypt the database password contact pam360-support@manageengine.com.
  • To install the PAM360 service, from the Command Prompt, go to the location '<PMP Installation Directory>/bin' and execute sh pam360.sh install
  • Now start the PAM360 service, using /etc/init.d/pam360-service start.
If you need any assistance or clarifications, please contact pam360-support@manageengine.com.